I think that the Blend If sliders in Photoshop are perhaps one of its most powerful features, and they also seem to be one of its least known and least well used.
For me, the day I really started to understand what they did, and how you can use them, was a real “light-bulb” and watershed moment in my Photoshop journey.
You’ll find the Blend If sliders in the Layer Styles dialog box (see Figure 1), which you can get to by double-clicking an empty part of a layer in the Layer panel or by right-clicking a layer and choosing Blending Options.
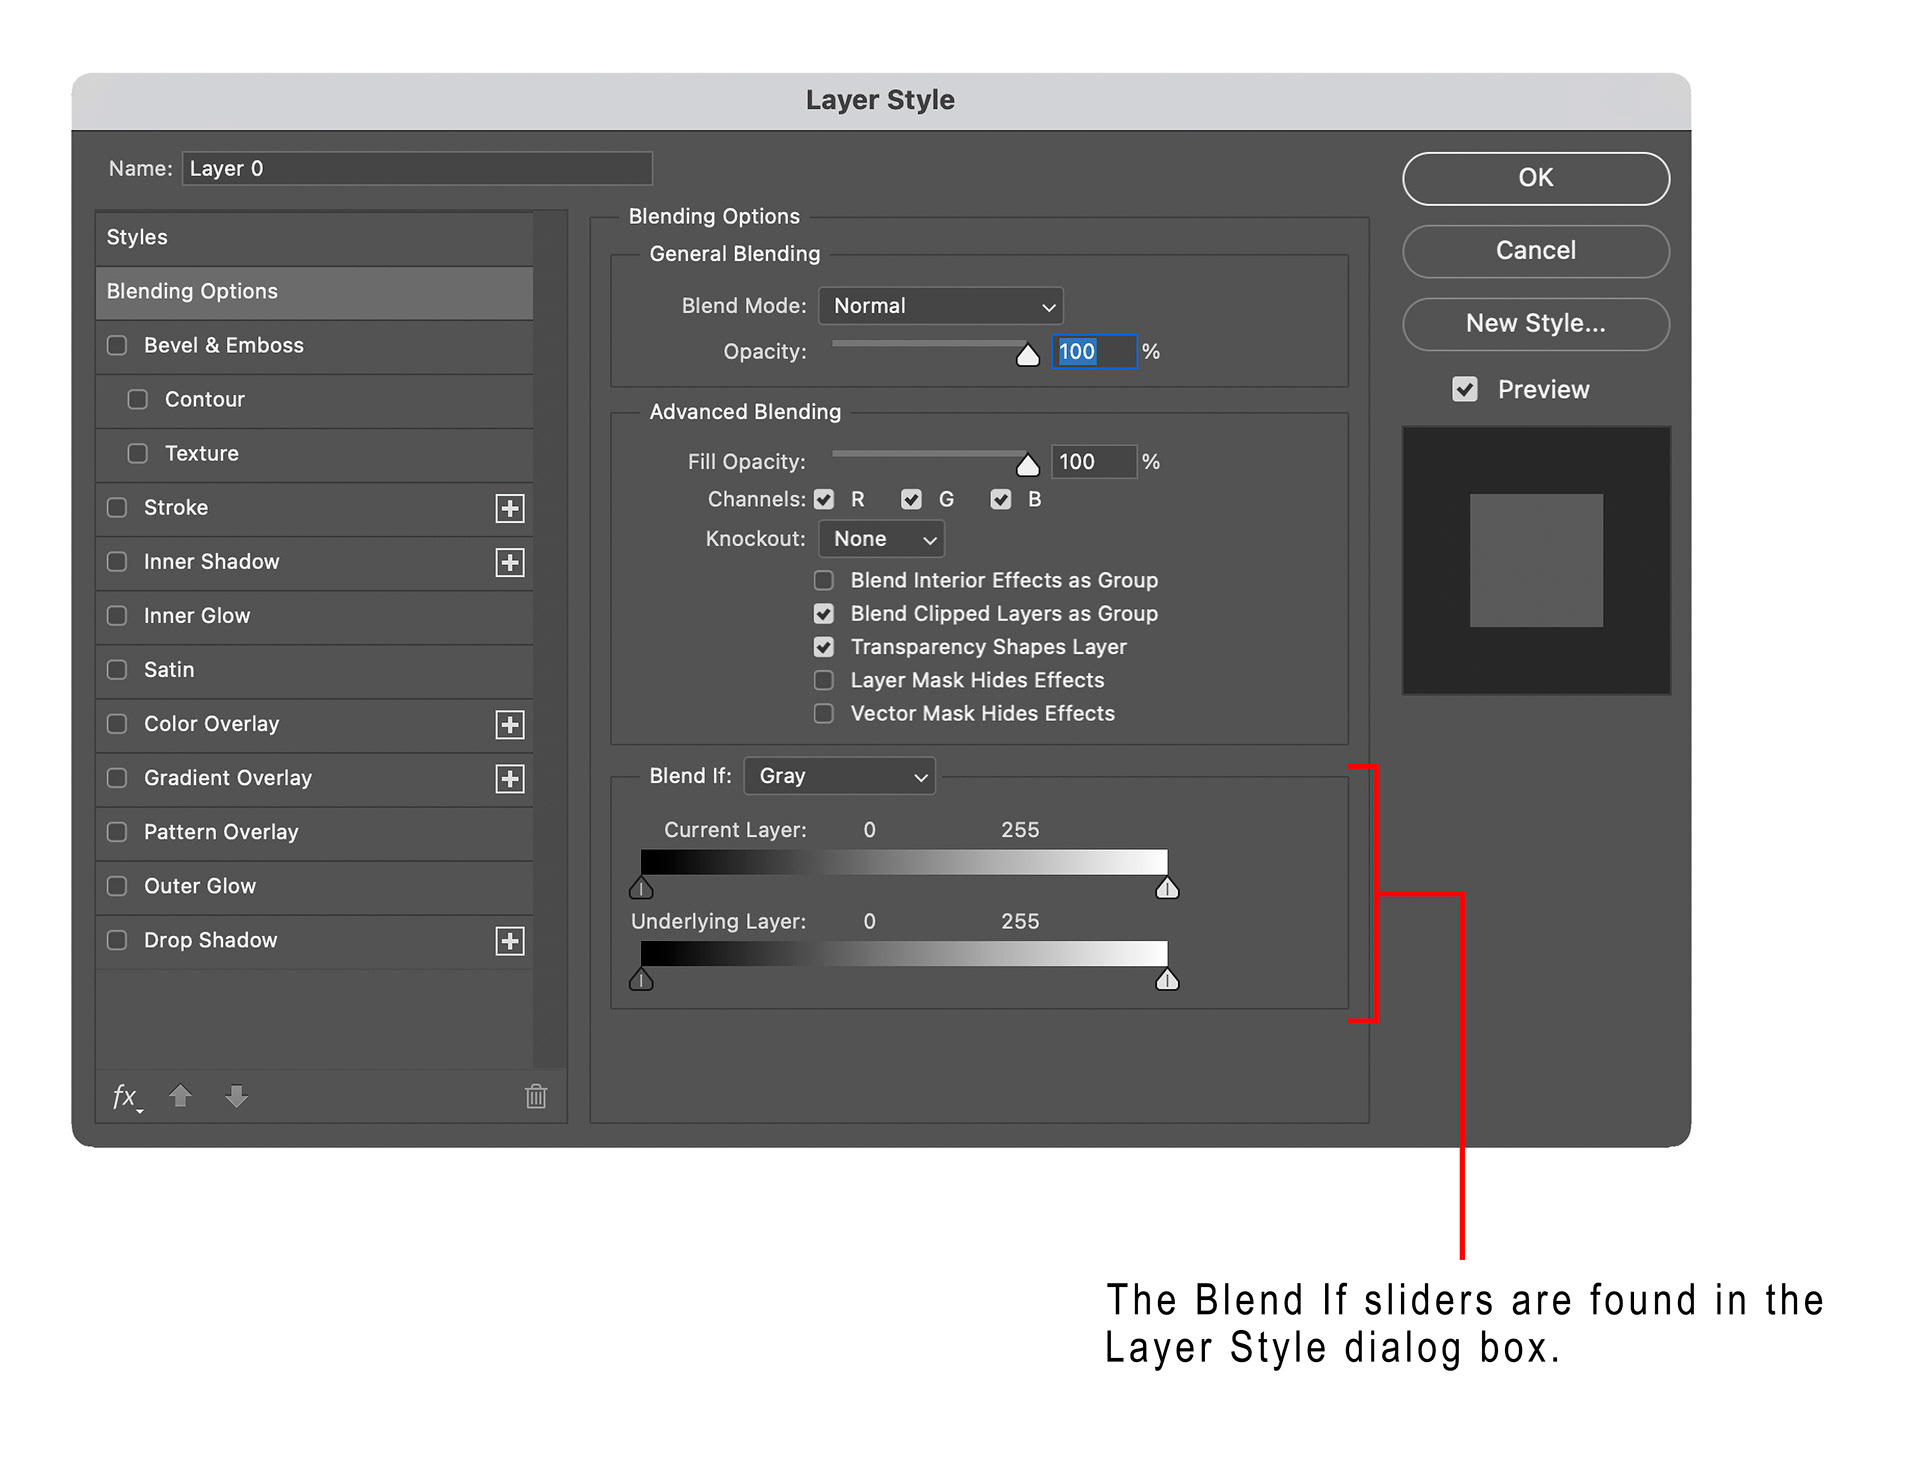
Fig 1 - Layer Style dialog box
So what do the Blend If sliders do? They allow you to blend the contents/effect of a layer (it can be a pixel layer or an adjustment or fill layer) with your image based on either the luminosity or colour of that layer, or the luminosity or colour of the composite image that the layer sits on top of.
Within the Blend If section of the Layer Styles dialog box, there are three different areas (see Figure 2).
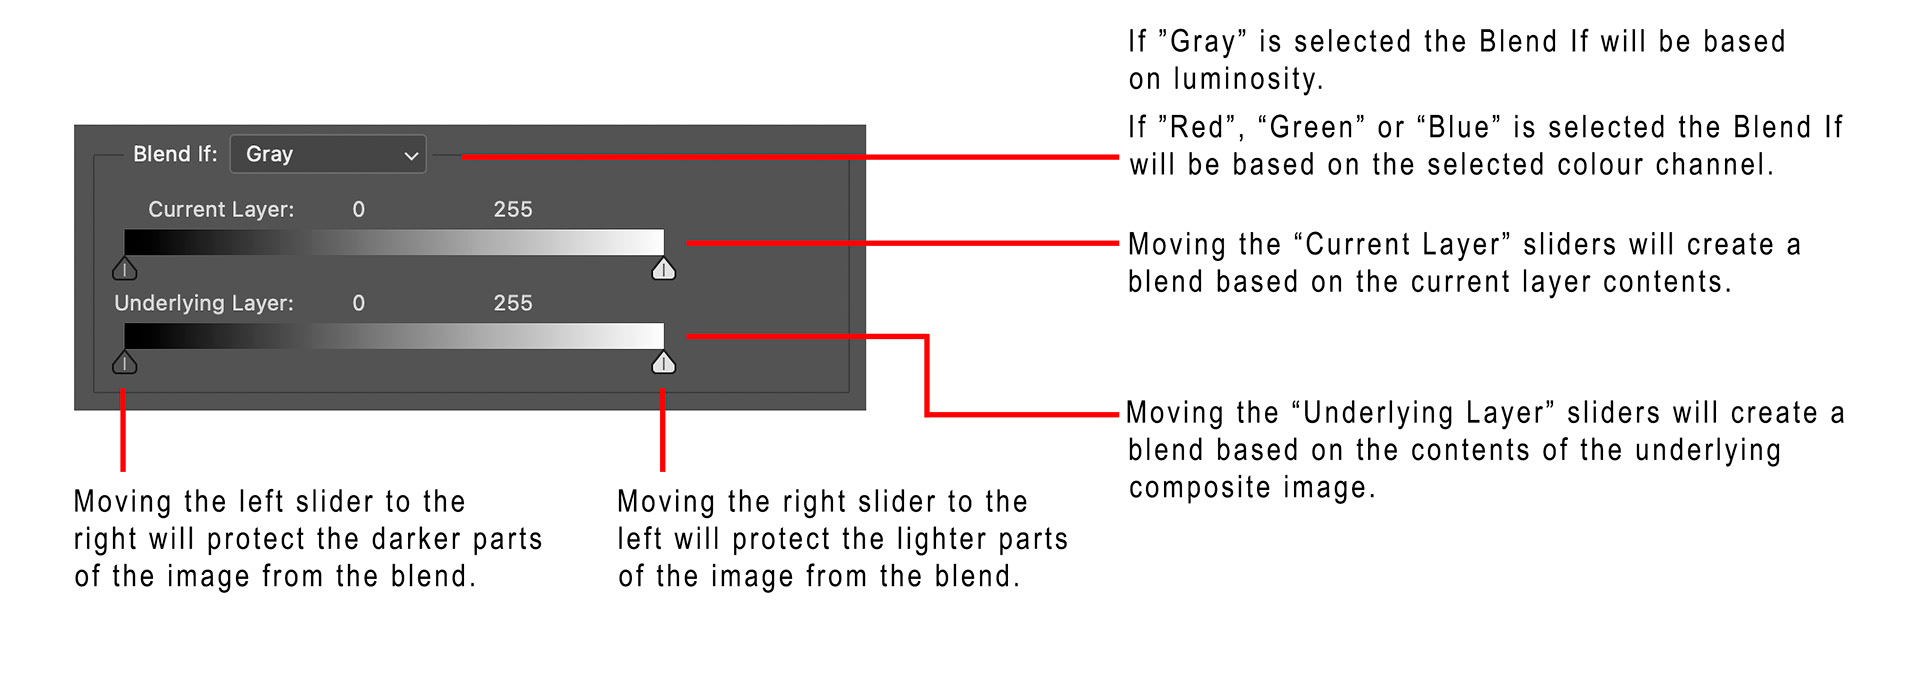
Fig 2 - The Blend If sliders
From the first drop-down you can choose “Gray” or “Red”, “Green” or “Blue”. If “Gray” is chosen, the Blend If sliders will operate based on the luminosity (brightness) of the image, so you can selectively affect shadows, highlights or midtones (with infinite flexibility). If you choose “Red”, “Green” or “Blue” then the colour channels will be used, we won’t be discussing those in this article.
Then you have two sliders; moving the handles on the “Current Layer” gradient will blend the contents of the layer based on the luminosity of its own contents. Moving the handles on the “Underlying Layer” gradient will blend the contents of the layer based on the luminosity of the underlying composite image.
Each of the sliders is based along a gradient that goes from zero (black) on the left to 255 (white) on the right, and each has two handles, one that starts at the darks (zero) position and one that starts at the lights position (255). The darks handle is a darker colour than the lights handle.
As you move these sliders inwards you are telling Photoshop to only blend the contents of the layer based on the luminosity values inside the two handles, or you can think of it as protecting the area on the outside of the handles. Please refer to figure 3a for an example.
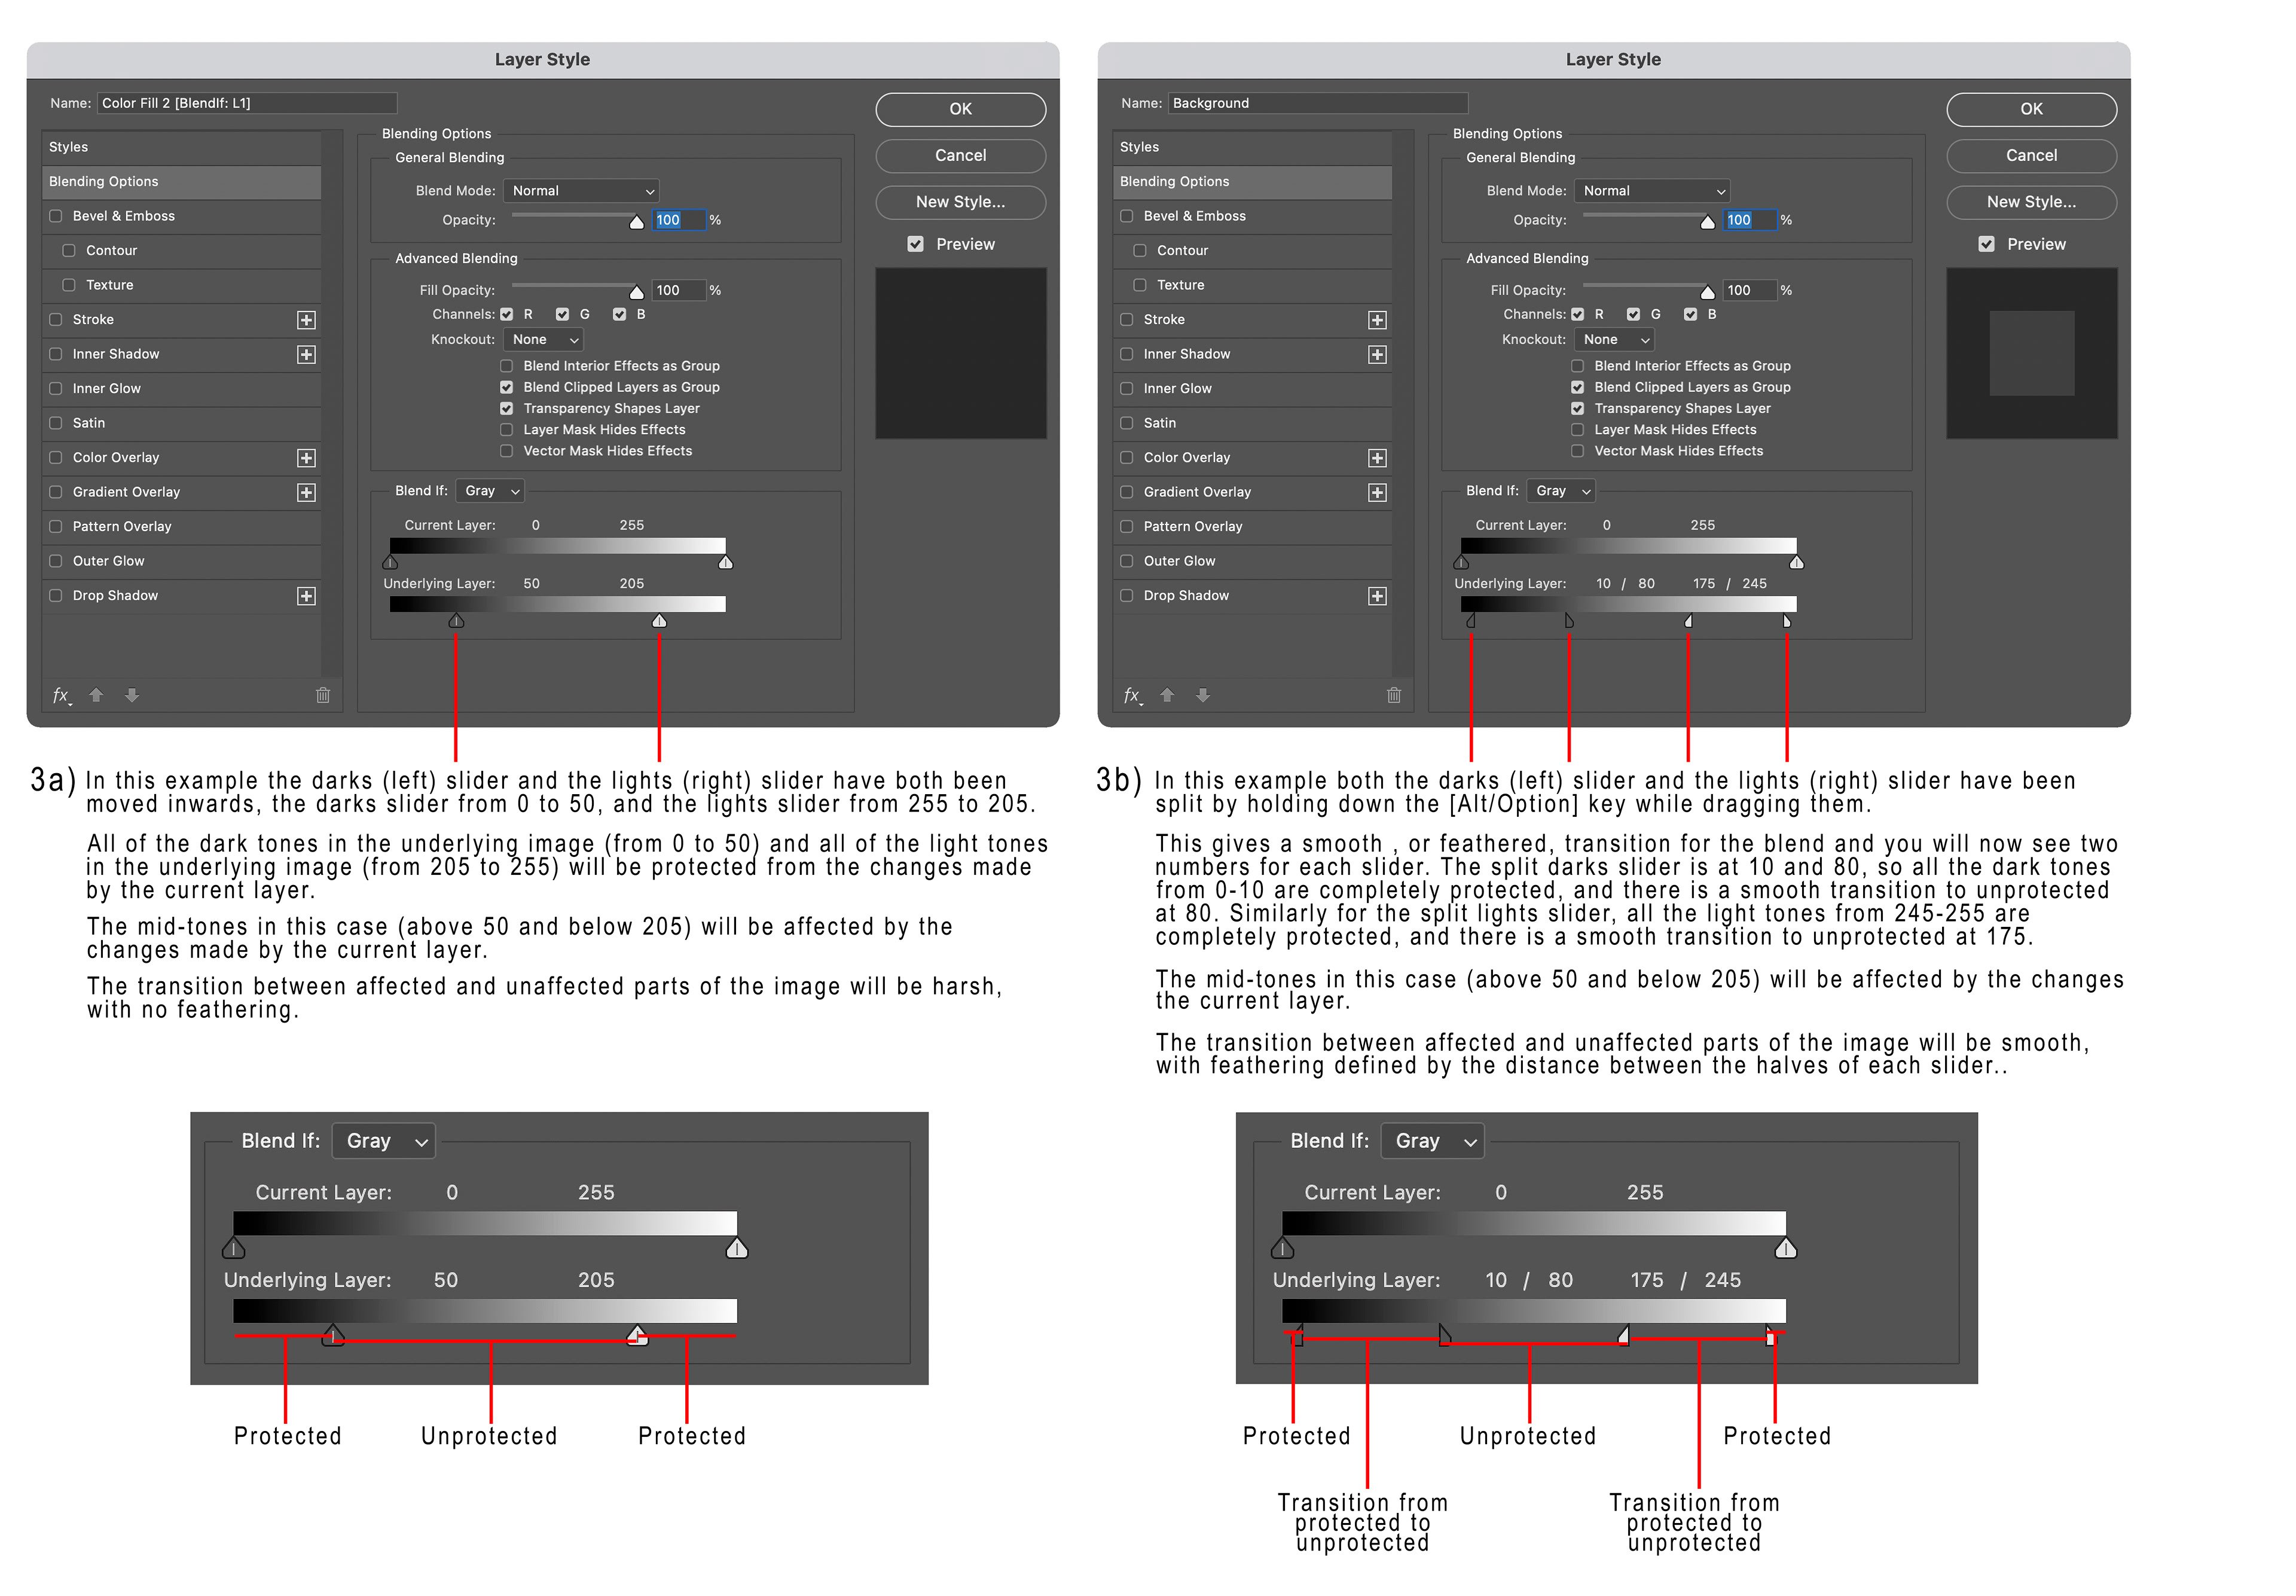
Fig 3 - Using the Blend If sliders
You’ll notice that each of the handles has a line down the middle, this indicates they can be “split”. You can split them by holding down the [Alt/Option] key while dragging the handle. The handle will split into two halves, and each can be dragged independently.
Luminosity values on the outside of the outer-most halves of the handles are completely protected from the blending (that is the layer has no effect, like setting the layer opacity to 0%).
Luminosity values on the inside of the inner-most halves of the handles are not protected at all (that is the effect of the layer is complete, like setting the layer opacity to 100%).
There is then a transitioning of the effect, like a feathering of a mask, between the halves of each handle, see figure 3b for an example.
Figure 4 shows a simple Blend If example, a theoretical example to see the effect of Blend If, setting up a simple example like this and playing with the Blend If sliders can be a great way to gain an understanding of what they do.
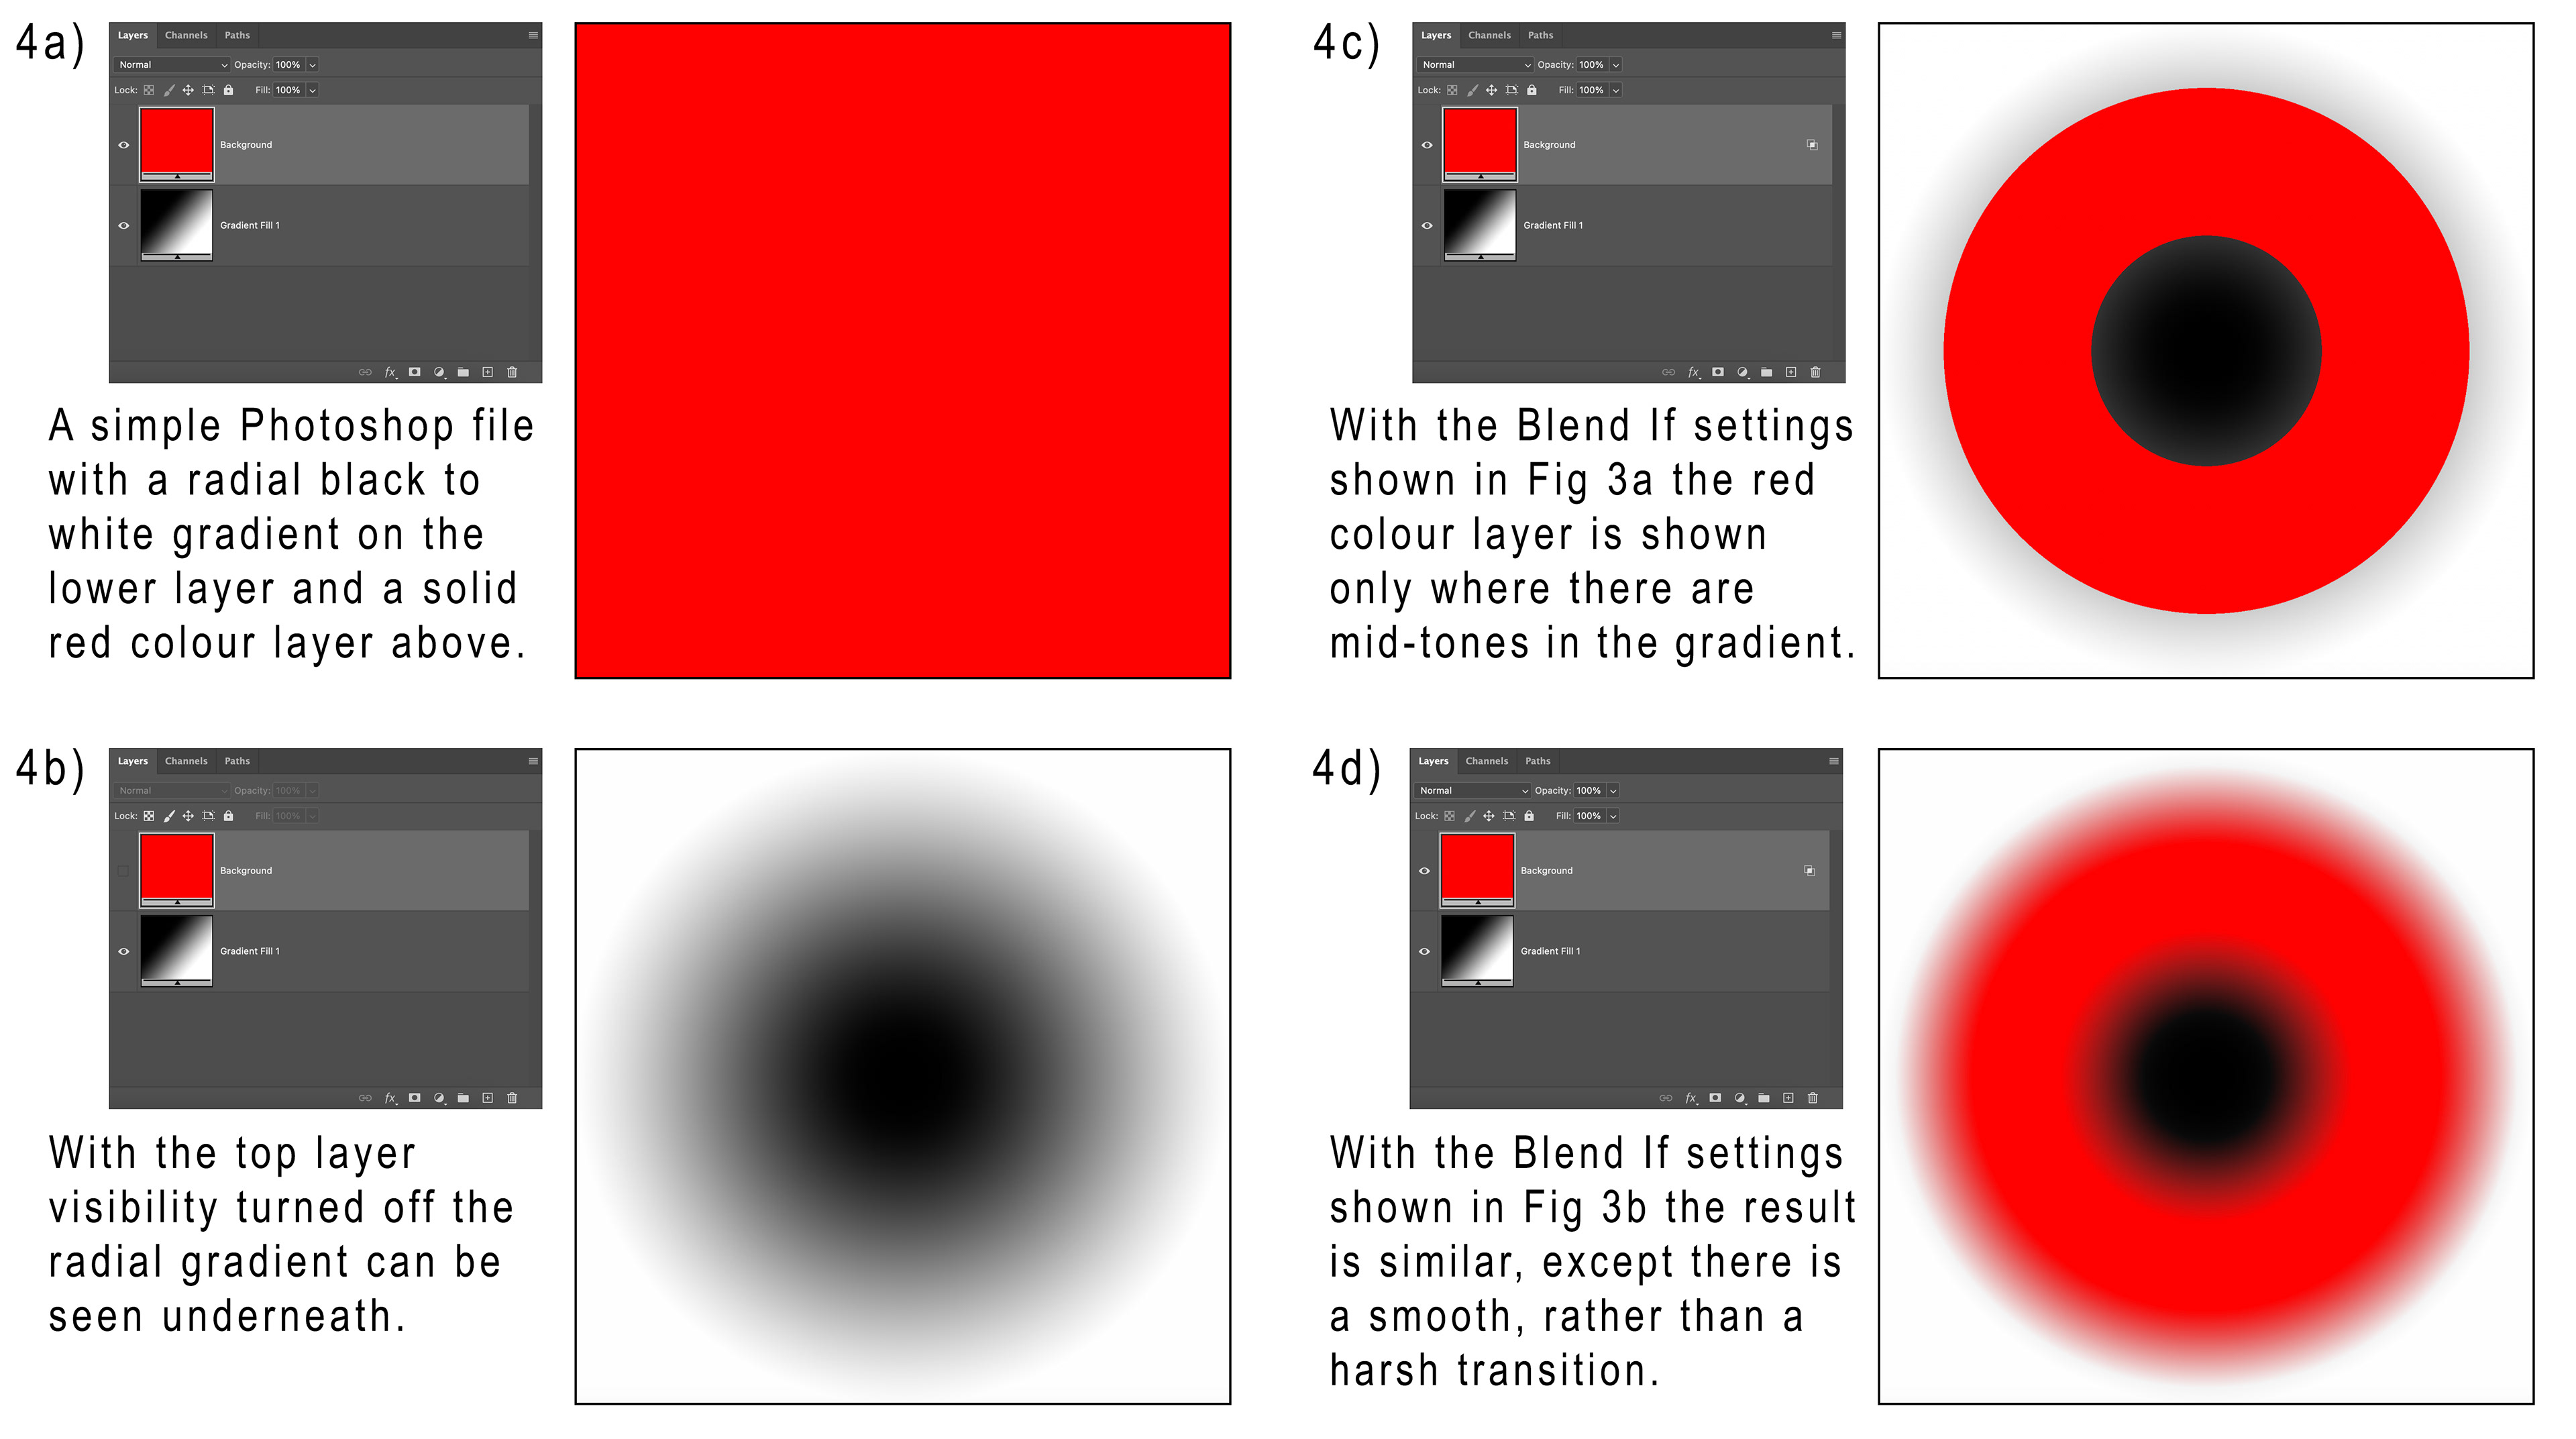
Fig 4 - A Blend If example
So, what are some examples of how you can use the Blend If sliders? Here’s three things I regularly use Blend If for, but there are many more things you can do with it.
I use Blend If every time I create a vignette to protect the dark shadows. If you apply a vignette, and the outer areas of your photo already has very dark areas, your vignette can make them too dark, using Blend If to protect them can stop this happening.
Blend If is great for colour grading if you want to apply one colour more in the shadows and another colour more in the highlights.
Blend If is great for blending textures. This is one place where it can sometimes be good to use both the Current Layer and Underlying Layer sliders together (yes, you can use them both at the same time!). Perhaps you only want the darker areas of the texture blended (use the Current Layer slider), and you only want them blended with the lighter areas of the image (use the Underlying Layer slider).
Using the Blend If sliders is very similar to using a luminosity mask but it has a couple of big advantages over luminosity masks. Firstly the Blend If method is much more space efficient and won’t bloat your Photoshop files like big pixel-based masks do. Secondly, Blend If is dynamic, if the underlying image changes in luminosity the Blend If will dynamically adjust to the newly changed image, a luminosity mask does not.
Don’t forget you can use the Blend If sliders in conjunction with masking, layer opacity and different blend modes too – your blending options are truly limitless.
I truly believe that the only way to really understand the Blend If sliders is to play with them, I highly recommend you do so.
This article was first published in the March 2024 issue of Artists Down Under magazine.