When creating composites one of the things we need to do to make them believable and realistic is to try and match the colour of the inserted element to the colour of the background, there are many ways to do this, this article describes two of my favourite methods.
Using Curves and the White, Black and Grey Point Droppers
- Create a Curves Adjustment Layer and clip it to the layer containing the element being composited.
- You will now use the Set Black Point, Set Grey Point and Set White Point droppers (see Figure 1) to adjust the colours.
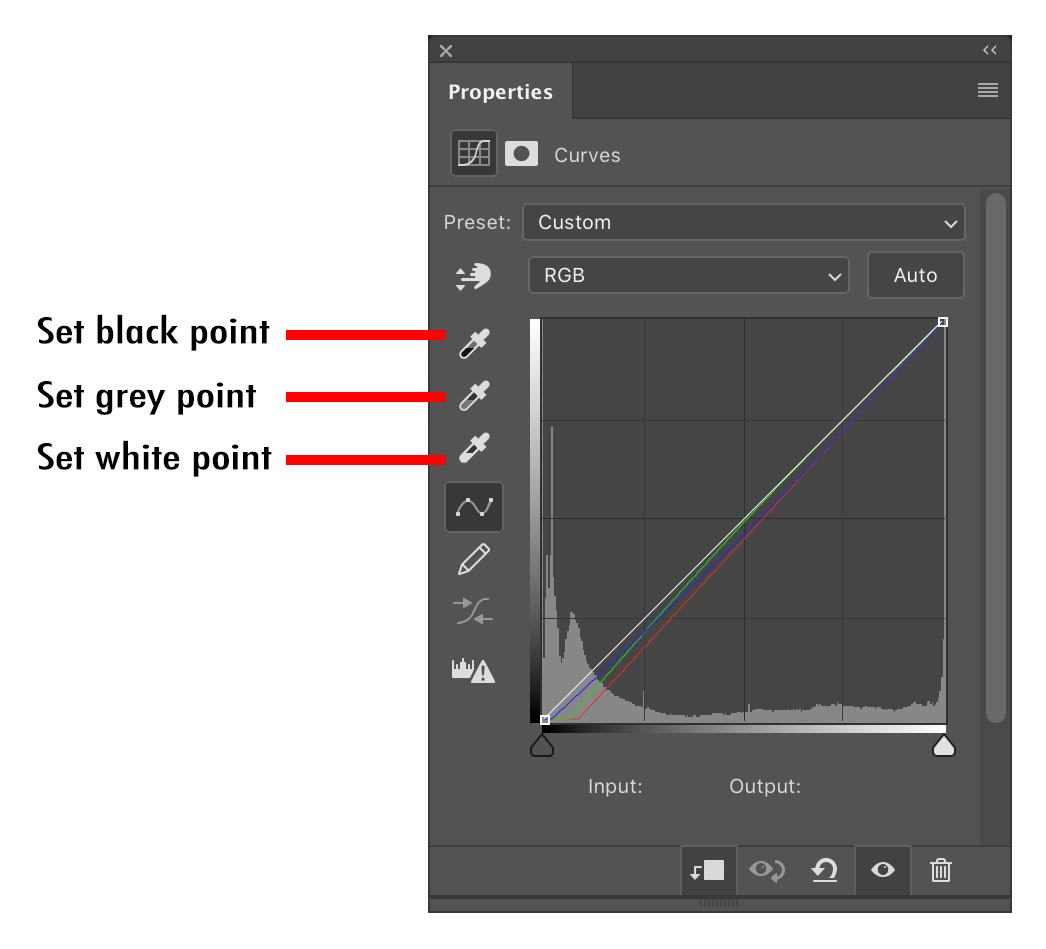
Fig 1 - Curves Properties panel
- Double-click the Set White Point dropper in the Curves dialog and the Colour Picker will appear. With the dropper, click the background image where you believe the white point is (the brightest part). When asked if you wish to “Set the new target colours as the defaults”, select “Yes”.
- Double-click the Set Black Point dropper in the Curves dialog and the Colour Picker will appear. With the dropper, click the background image where you believe the black point is (the darkest part). When asked if you wish to “Set the new target colours as the defaults”, select “Yes”.
- Double-click the Set Grey Point dropper in the Curves dialog and the Colour Picker will appear. With the dropper, click the background image where you believe the grey point is (closest to middle grey). When asked if you wish to “Set the new target colours as the defaults”, select “Yes”.
- Now select (single-click) the Set White Point dropper and click the layer containing the element being composited where you believe the white point is (the brightest part).
- Now select (single-click) the Set Black Point dropper and click the layer containing the element being composited where you believe the black point is (the darkest part).
- Now select (single-click) the Set Grey Point dropper and click the layer containing the element being composited where you believe the grey point is (the part closest to middle grey).
This will have shifted the luminosity and colours of your composited element much closer to the background.
Be aware that you have changed the default target colour values for these droppers, to change them back simply repeat steps 3-5 above but rather than clicking in the image to select a colour choose black, white and middle grey (RGB 128,128,128) in the colour picker.
Using an “Average” Solid Colour Layer
- Duplicate your background layer.
- Use the Filter / Blur / Average command on this duplicate layer, you will get a solid colour that is the average of all the colours in the background.
- Drag this layer above your composited element layer and clip it to the composited element layer.
- Change the blend mode of the “average colour” layer to Soft Light. You can also try Overlay, Hard Light or Vivid Light for slightly different results.
You can also combine both of the methods above (ie do both of them) for some nice results.
The above steps will need to be completed for each composited element in your image (if required).
This article was first published in the June 2019 issue of Artists Down Under magazine.