I am a huge fan of Luminosity Masks and use them all the time, it adds tremendous power to be able to restrict adjustments to particular brightness areas in your image.
There are many add-in products available to make using Luminosity Masks easier and this is a review of the one I have chosen, for reasons I will explain at the end of this article, called Lumenzia.
Lumenzia is an add-in panel for Photoshop that adds a huge amount of functionality, most of it around Luminosity Masks and Selections. This is what the Lumenzia panel looks like.
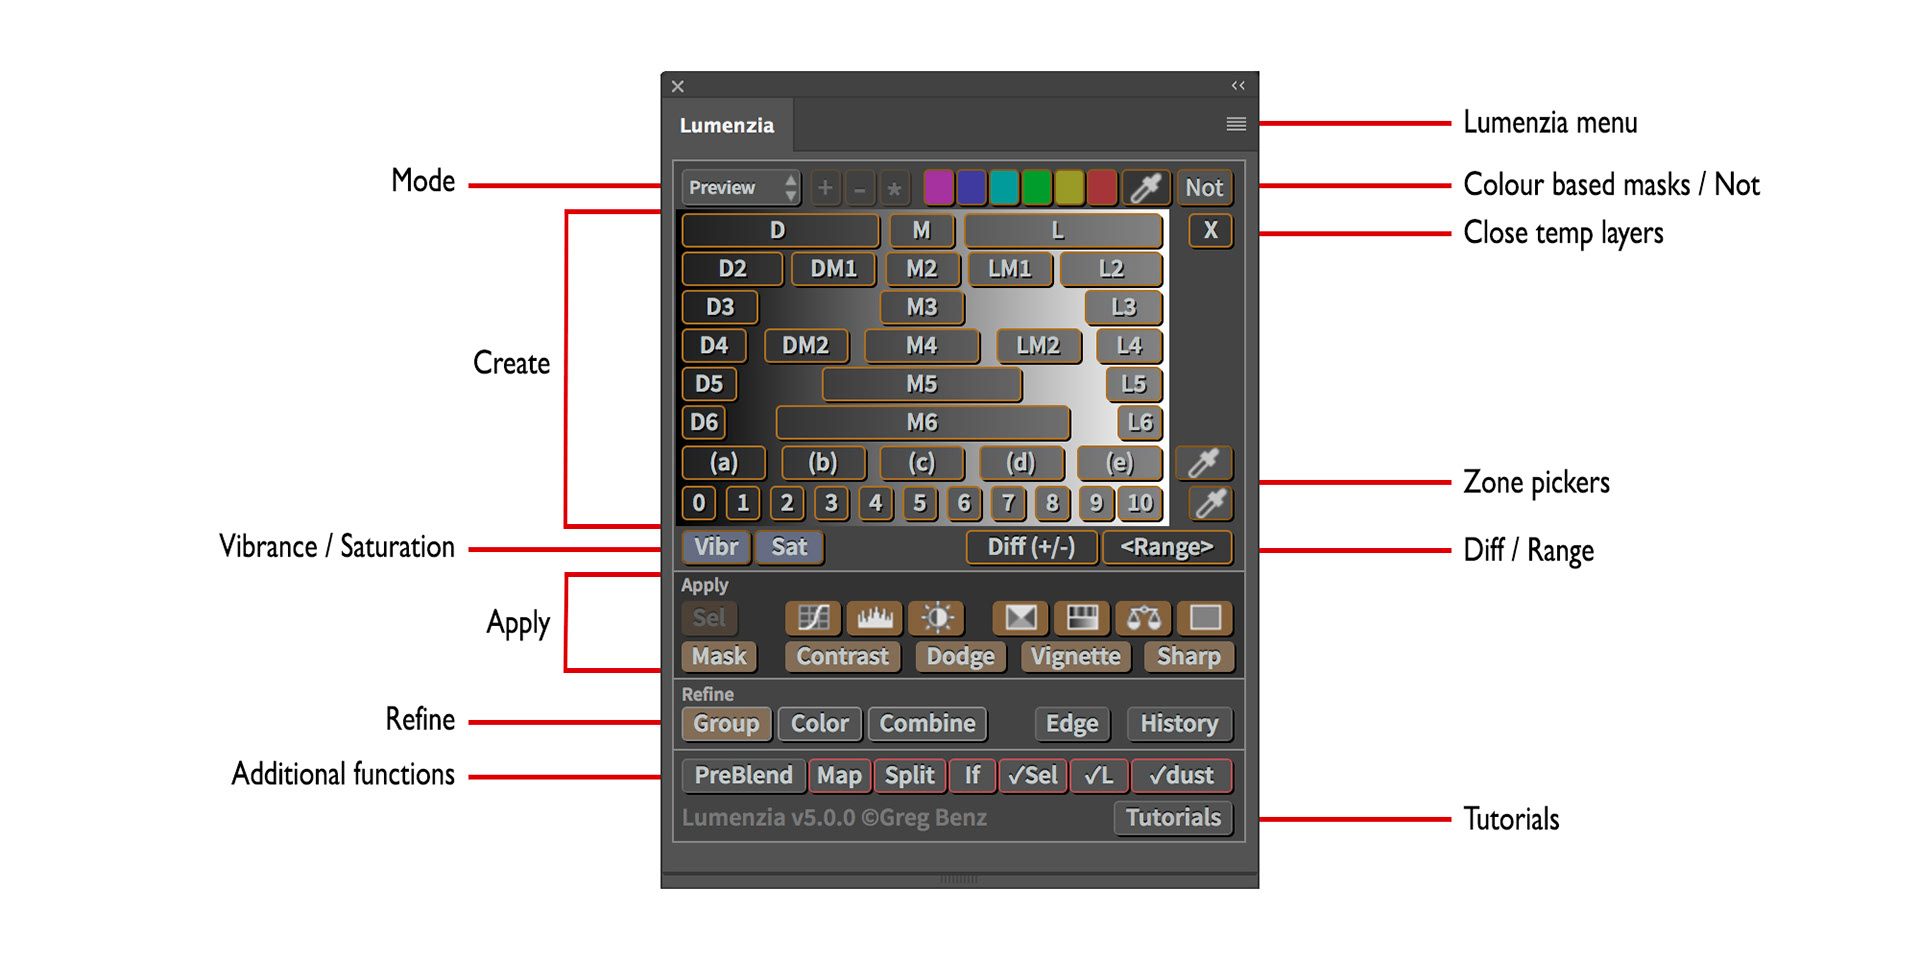
Figure 1 - Lumenzia panel
The Mode button at the top left defaults to “Preview” and that is the mode I use the panel in most of the time. I will briefly explain some of the other modes later in the article.
The Create buttons are where you select the type of mask you want, the three columns of buttons labelled D, D2, …. D6 and M, M2, …. M6 and L, L2, …. L6 are for Darks, Midtones and Lights respectively. For example if you choose L the lighter pixels in your image will be more selected, the darker pixels less selected. As you progress down the L buttons towards L6 then only the brightest pixels become progressively more selected.
When you press one of these buttons, Lumenzia will show you a visualization in the image window of what the mask will look like, and will create some temporary orange layers in your document. If you don’t think the mask is what you want, you can press a different one of the Create buttons.
The a, b .… e and 0, 1, …. 10 keys are another way to choose the mask you want based on zones of Luminosity, like the Ansel Adams Zone System.
You can also use the Zone Pickers or the Range button to create a mask based on tones (or a range of tones) that you select in the actual image.
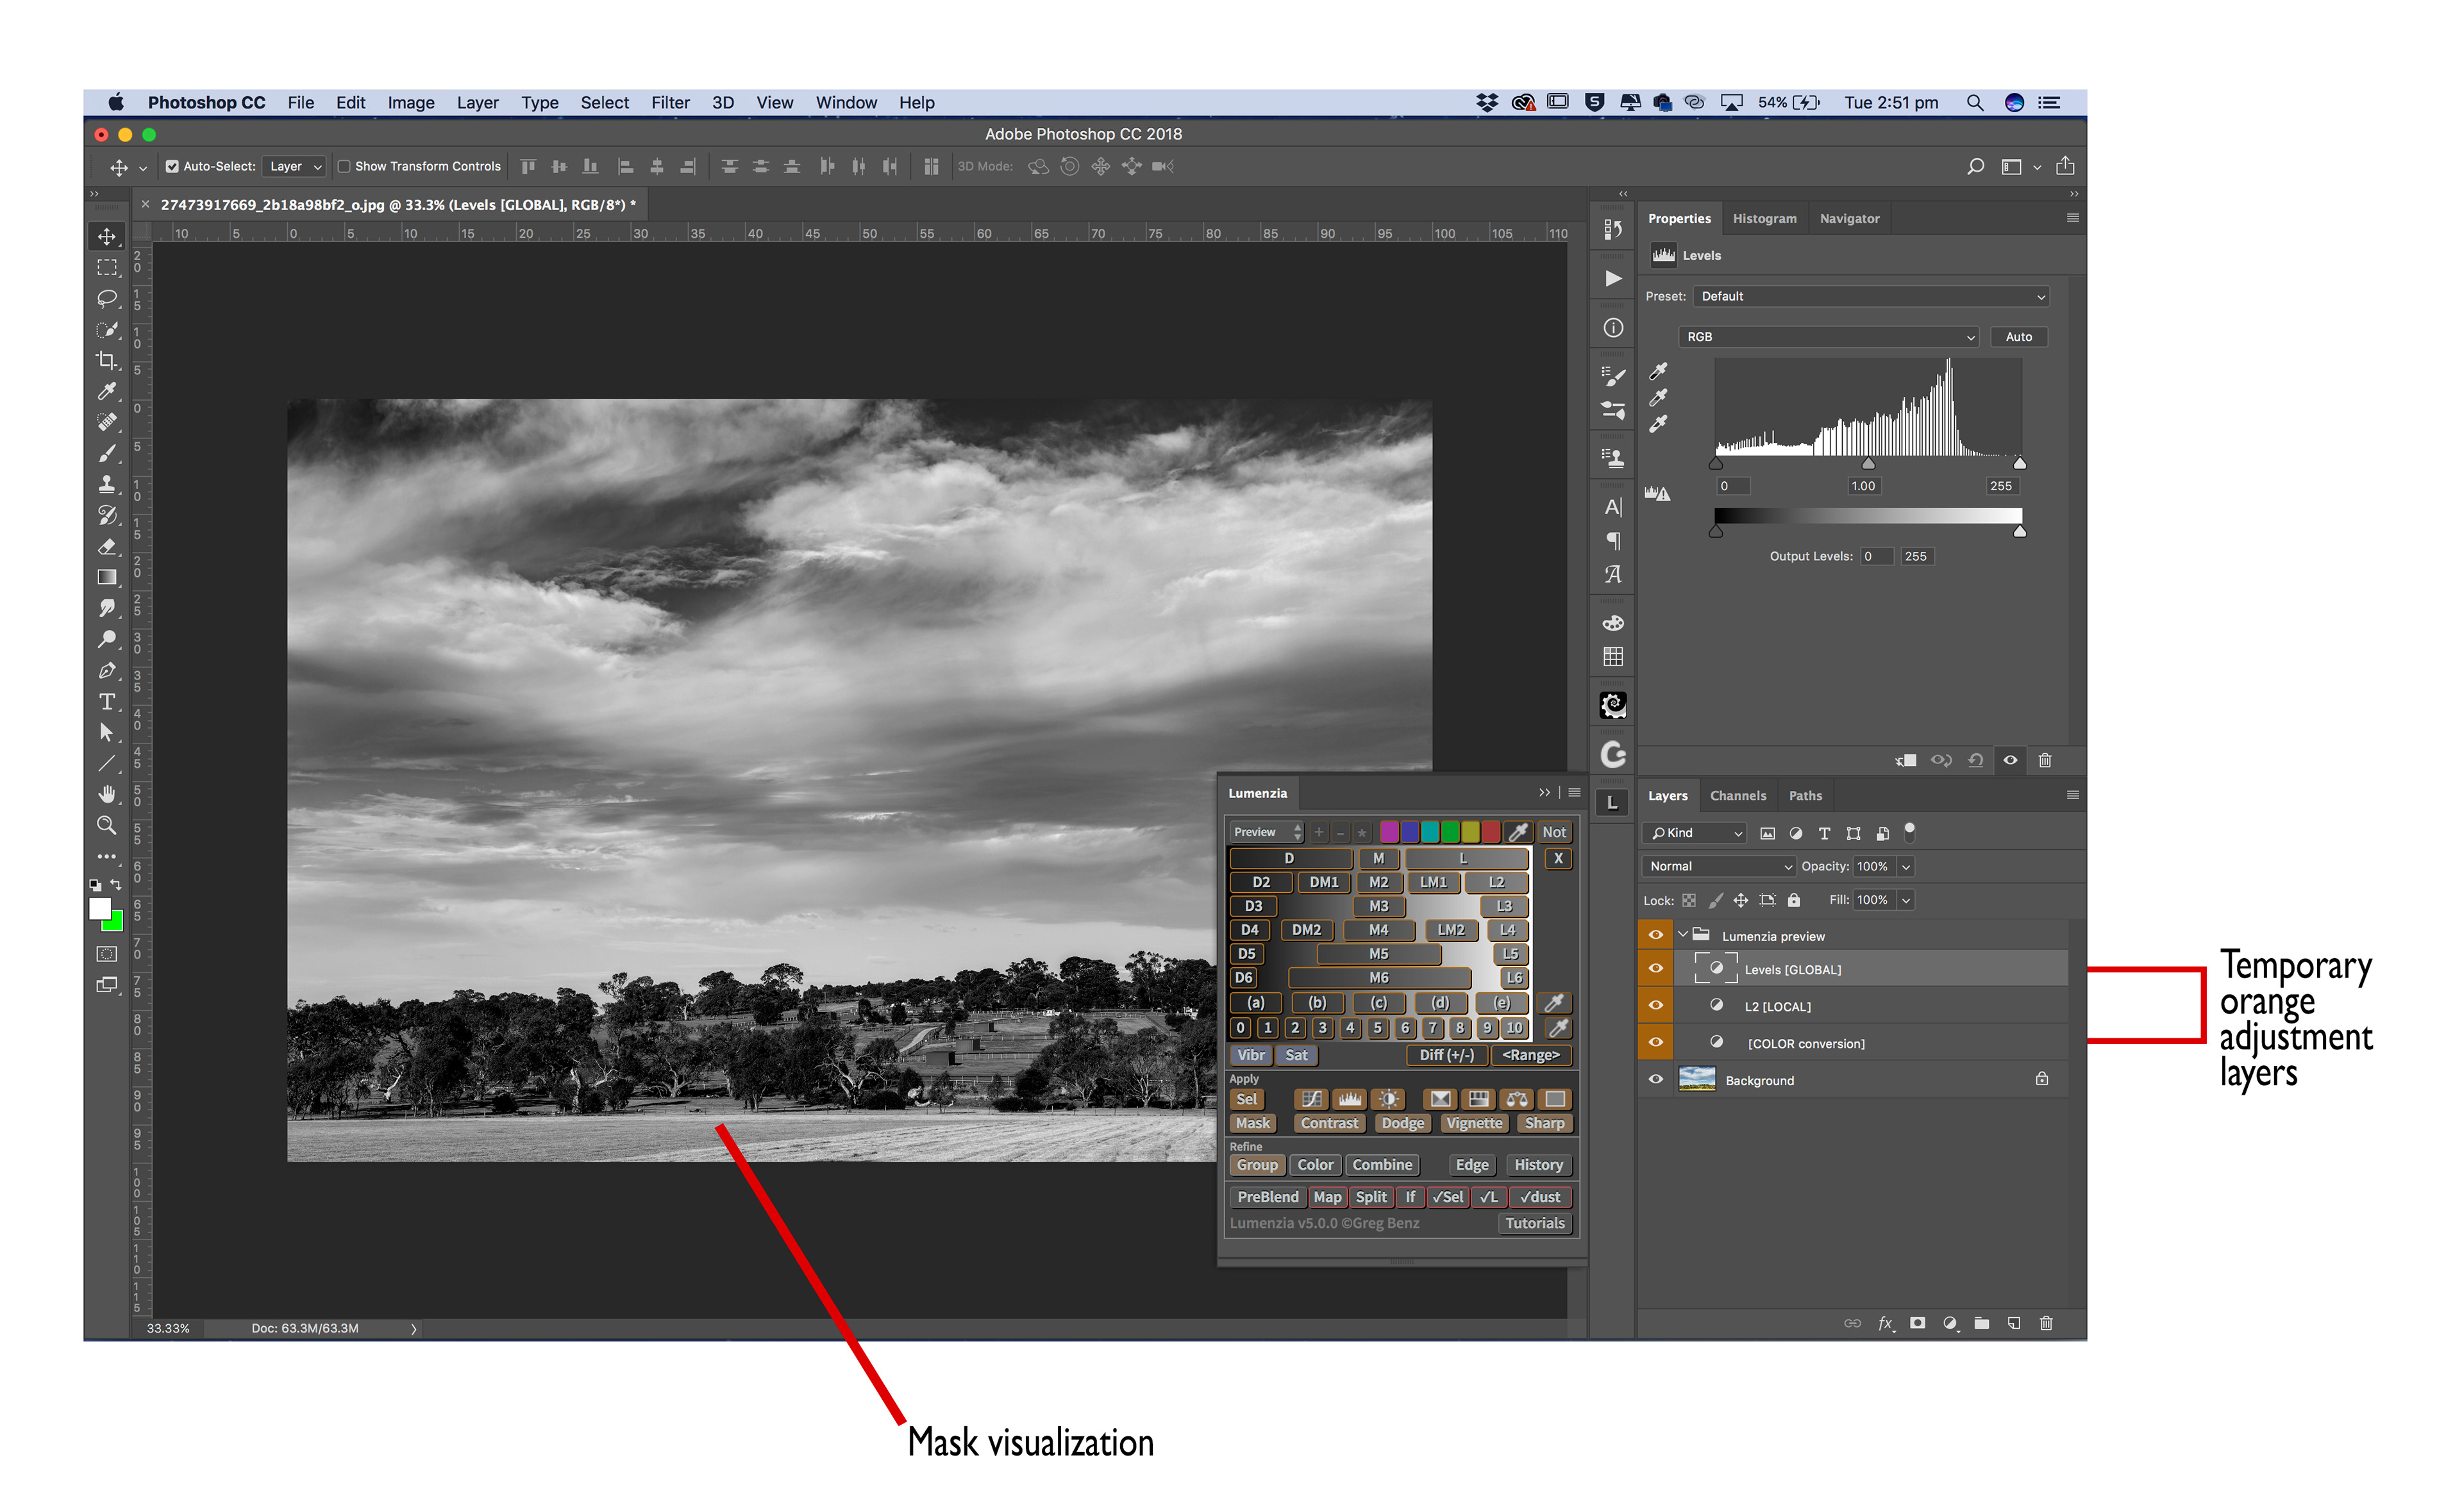
Figure 2 - Lumenzia in action
The bottom layer of the temporary orange layers is a Black and White adjustment layer that you can use to affect the mask based on the colours in the image. For example, if I wanted to affect the selection of the sky in the image in the picture above, I could slide the blue slider and the visualization of the mask changes as you do it. The top layer of these temporary orange layers is a Levels layer that you can use to modify the overall lightness / darkness of your mask.
Once you are happy that the mask is what you want, you click one of the buttons in the Apply section of the Lumenzia panel.
“Sel” applies the mask as a selection. “Mask” applies the mask to the active layer. Then there are buttons for Curves, Levels, Brightness/Contrast, Selective Color, Hue/Saturation, Color Balance and Solid Color – these will create the appropriate adjustment layer with the chosen mask applied. Then, as you make adjustments in the adjustment layer they are only applied to the area of the image you chose when creating the luminosity mask.
Note, if you choose not to proceed, click the “X” button towards the top-right of the panel to remove the temporary orange layers.
The buttons in the Refine section allow you to further refine your masks by adding a group with a mask, based either on a manual selection, any temporary orange layers you have present from the Create buttons, or from a colour selection (for the Colour button).
I also love the Vignette, Dodge & Burn and Sharpen features, as these simplify these processes greatly for me, I use at least one of these buttons on nearly every image I process, even if I don’t use a luminosity mask.
There are four other modes available via the Mode button. “LIVE-M” creates a mask directly on the active layer without the preview and temporary orange layers being displayed. “LIVE-S” creates a selection without the preview and temporary orange layers being displayed. “If:Under” and “If:This” modify the BlendIf sliders to perform the masking rather than creating an actual mask.
There are many other features of Lumenzia that I am not going to go into here for fear of confusing everyone, but let me just say that the “tooltips” you get when you hover the mouse over any button are great, and offer multiple variations of nearly every button via modifier keys.
So why do I like Lumenzia?
I have tried a number of other Luminosity Masking panels, including two other purchased ones, and I find Lumenzia the easiest to use, and the most reliable. It is as fully featured as any of the others I’ve tried.
It is not expensive – at only US$40 it is very affordable and great value for money.
It is upgraded frequently, and new and improved features added regularly, and these upgrades are made available at no cost (through five major releases so far).
There is an excellent user guide, and many explanatory videos on the various features, and examples of use. Many key videos are linked in the PDF user guide.
Lumenzia is written by Greg Benz and is available from his website.
Greg is one of those technical people that does a great job of explaining technically difficult topics in an easy to understand way, so I would highly recommend his website anyway even if you choose not to try Lumenzia, it contains great photography and many other interesting articles and videos. He also has a free Luminosity Masking panel available if you decide not to purchase Lumenzia, but my recommendation is that the money for Lumenzia is a good investment.
If you have any questions about Lumenzia feel free to ask me.
This article was first published in the May 2018 issue of Artists Down Under magazine.