One of the rules of photography is that the closer your camera is to your subject the narrower your depth of field is. So, the closer you are, the less of your image that will be in focus.
This creates one of the biggest problems for macro photographers, who often want to get as close to their subject as their macro lens will allow. For example, on an APS-C crop-sensor camera, at a focal length of 100mm, with your subject 30cm away and an aperture of f/11, the depth of field is a tiny 2.5mm.
One of the ways around this limitation is to focus stack some images. This means you take a number of exposures of your subject, each focused on a slightly different area, and then merge the different exposures together in software such as Photoshop.
When taking the exposures, minimal movement is required, so my recommended setup is a stationary subject, with the camera mounted on a sturdy tripod. Using a remote control, and having mirror-lockup enabled will further reduce the chance of any movement that can soften your images.
I like to use Live View for this sort of photography as it lets me zoom in and focus to make sure I get an image with every important area of my subject in focus. Live View also automatically locks-up the DSLR mirror so that is one less thing I have to worry about.
I will usually aim to take at least 10 images for each focus stack, if you take too few you can end up with blurry areas in your image.
There are dedicated focus stacking software packages like Helicon Focus and Zerene Stacker, but good old Photoshop also let’s us focus stack images.
Here’s the steps to focus stack in Photoshop
Step 1
Use the File / Scripts / Load Files into Stack menu option, and select all of the focus-stacked images you have taken.
Use the File / Scripts / Load Files into Stack menu option, and select all of the focus-stacked images you have taken.
Step 2
Make sure the Attempt to Automatically Align Source Images check box is checked and press OK.
Make sure the Attempt to Automatically Align Source Images check box is checked and press OK.
Step 3
Select all the layers (click the first layer, hold Shift and click the last layer).
Select all the layers (click the first layer, hold Shift and click the last layer).
Step 4
Choose the Edit / Auto-Blend Layers menu option, and make sure that the Blend Method is set to Stack images, and that the Seamless tones and colours check box is checked, then press OK. Figure 1 shows the Layer Panel after Photoshop has blended the focus stacked images. You’ll notice that Photoshop has placed masks on every layer and the most in-focus regions of each layer are masked-in (white).
Choose the Edit / Auto-Blend Layers menu option, and make sure that the Blend Method is set to Stack images, and that the Seamless tones and colours check box is checked, then press OK. Figure 1 shows the Layer Panel after Photoshop has blended the focus stacked images. You’ll notice that Photoshop has placed masks on every layer and the most in-focus regions of each layer are masked-in (white).
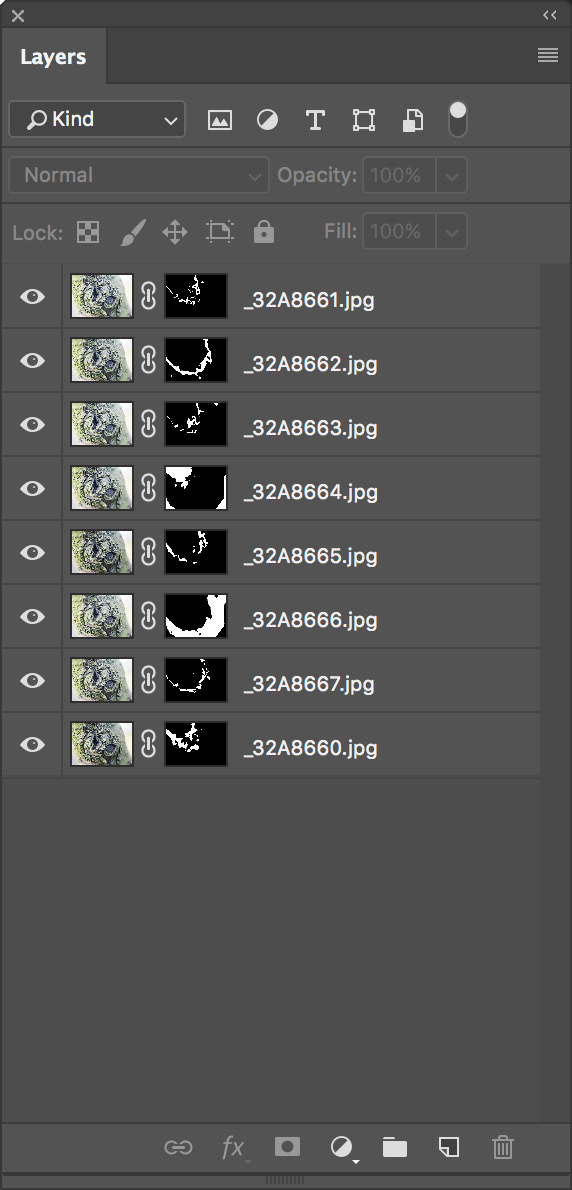
Figure 1 - Layer Panel after blending
Step 5
Now you will find you’ll likely have to crop off some edges due to the alignment of the different layers, and you can create a merged layer, or flatten the image and perform your normal exposure/clarity/sharpening steps on the stacked image.
Now you will find you’ll likely have to crop off some edges due to the alignment of the different layers, and you can create a merged layer, or flatten the image and perform your normal exposure/clarity/sharpening steps on the stacked image.
Please note that focus stacking is not limited to macro photography, you can focus stack a landscape too if you wish, take a few shots, focusing one on the foreground, one on the background, and a few in between, then follow the steps above to stack and blend them.
This article was first published in the March 2018 issue of Artists Down Under magazine.