Introduction
A path in Photoshop is a vector-based object made up of anchor points and line segments. The line segments can be straight or curved. A path can be “closed” like a square or a circle, or can be “open” with two obvious ends, like a curved line.
Paths can be converted into selections, and this is certainly my most common use, but they can also be used to create shapes and vector masks.
It is possible to make much more precise selections with the Pen tool than with the other selection tools. It is particularly valuable when the object you are selecting closely matches the background in tone and colour, making the other selection tools difficult to use.
The Elements of a Path
Figure 1 shows the different elements of a path. An anchor point is where the path changes direction. An active or selected anchor point is shown as a solid square, those that are not selected are shown as hollow squares.
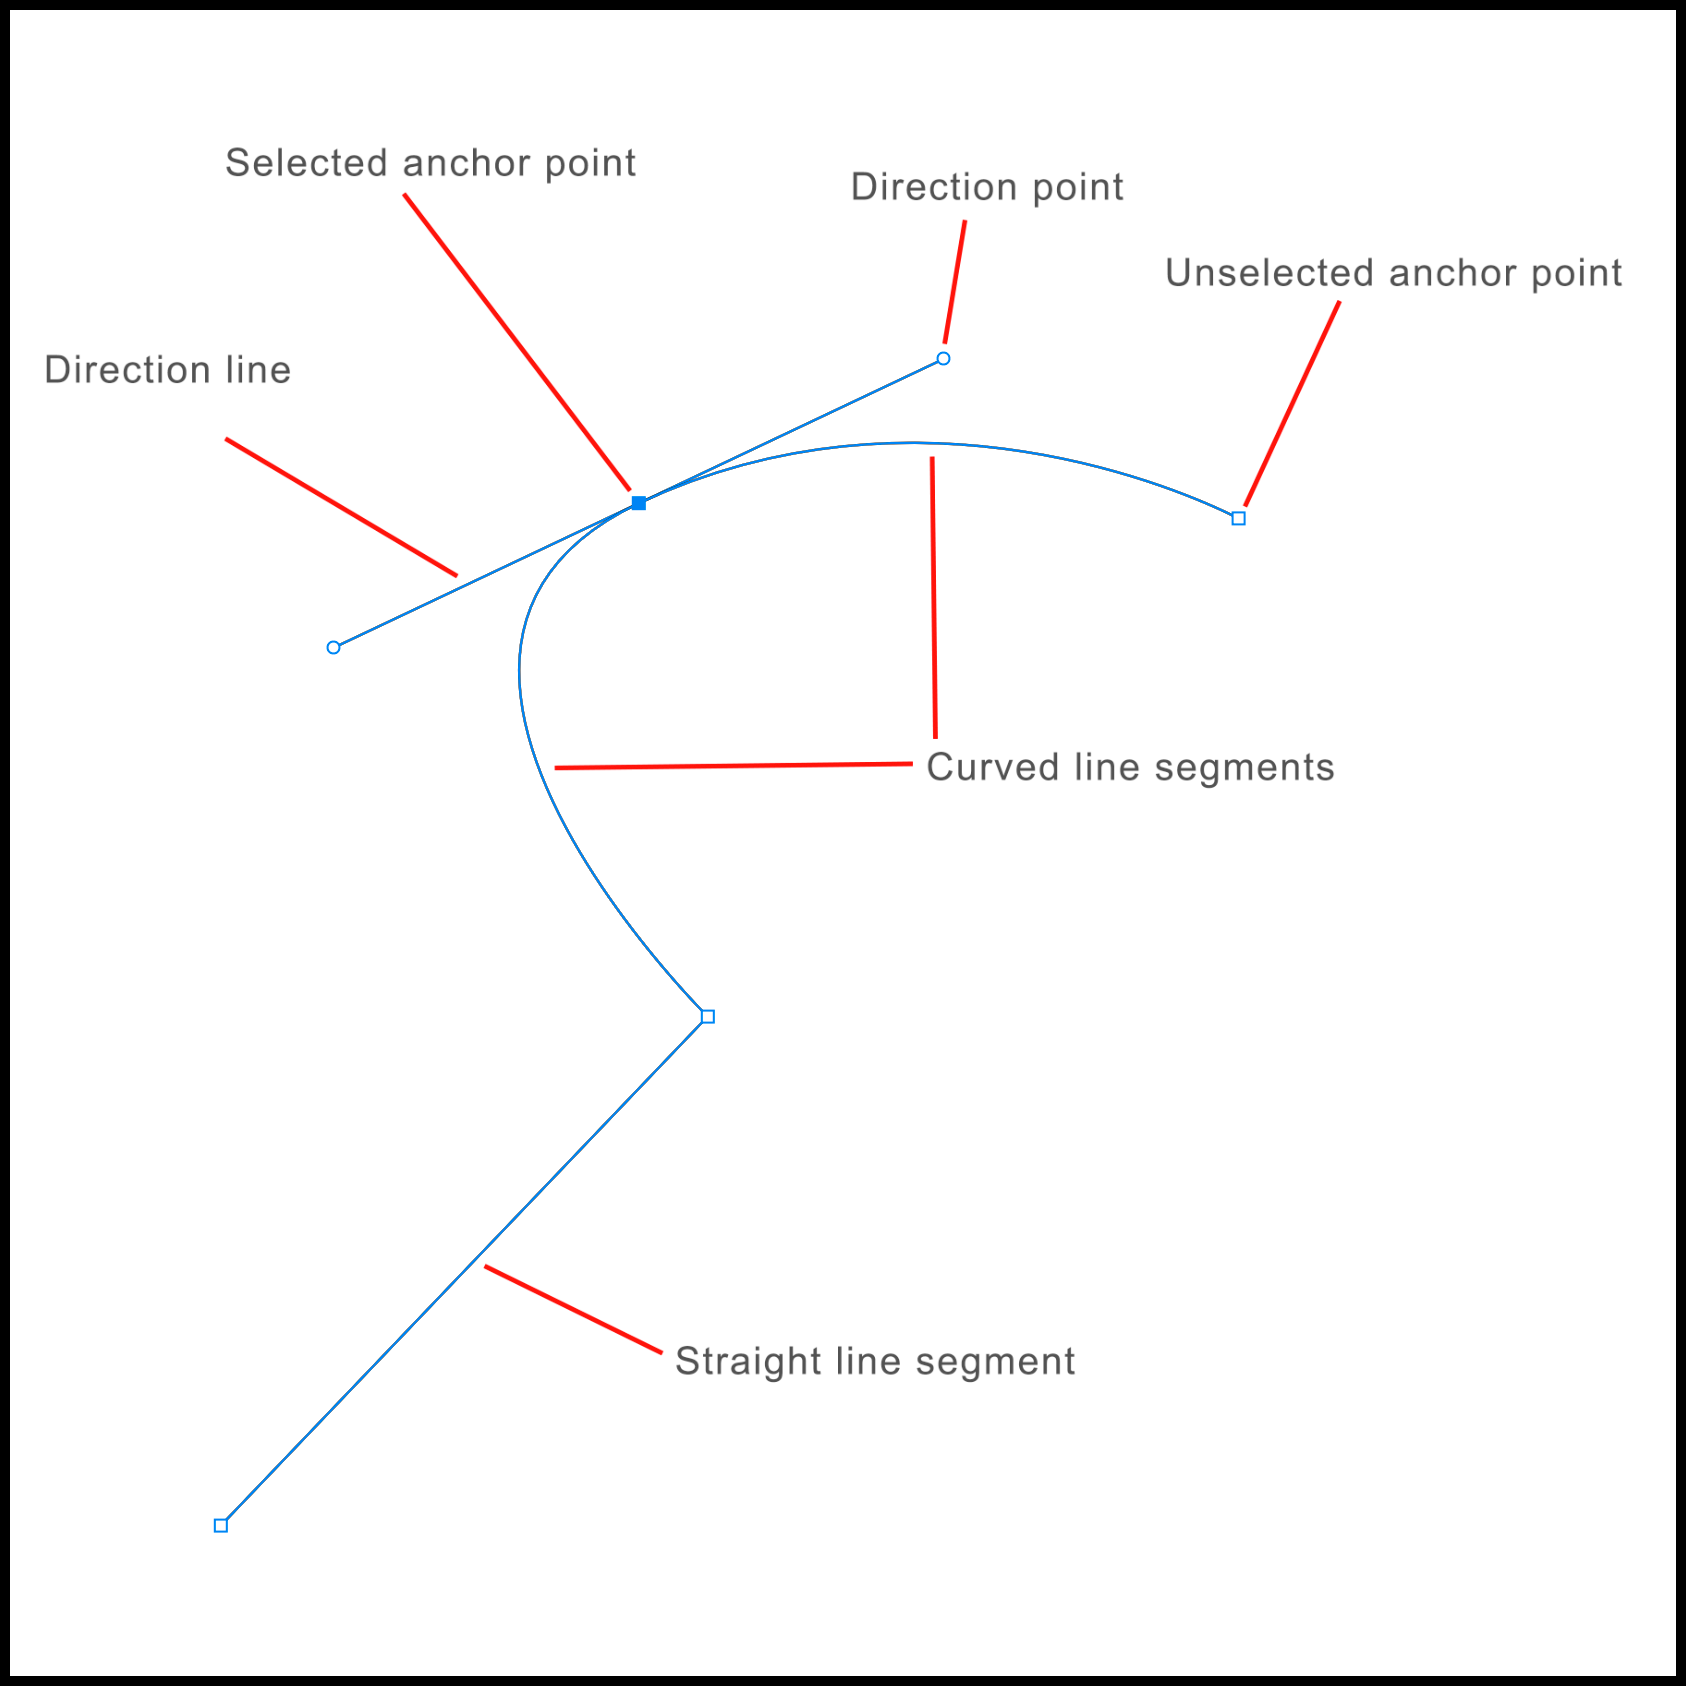
Fig 1 - The elements of a Photoshop path
For anchor points at the end of curved segments you will see one or two direction lines, with direction points at the end – these are used to define the shape of the curve. Some people also refer to these as direction handles or Bezier handles. To change the shape of a curve, drag the direction points around.
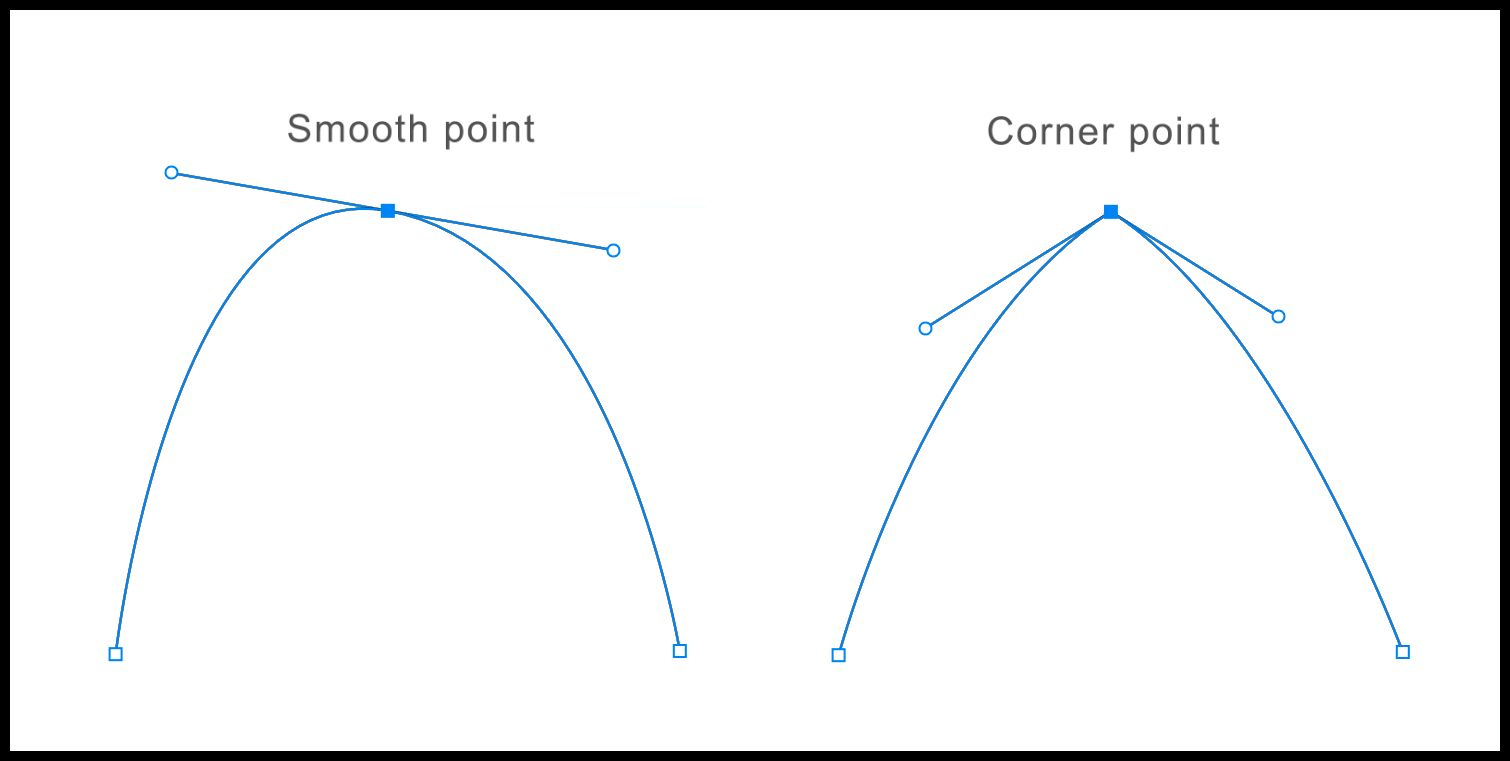
Fig 2 - Smooth vs corner points
Figure 2 shows the different sorts of corner points. By default when you create a curved segment you will get a smooth point. When you drag a direction handle on a smooth point, both sides of the curve (either side of the anchor point) are affected identically. For a corner point you can affect either side of the curve separately, the direction lines/handles are independent of each other.
The Pen Tools
You can use the Pen tools (shortcut key P) to create a path. Figure 3 shows the tools that are available.
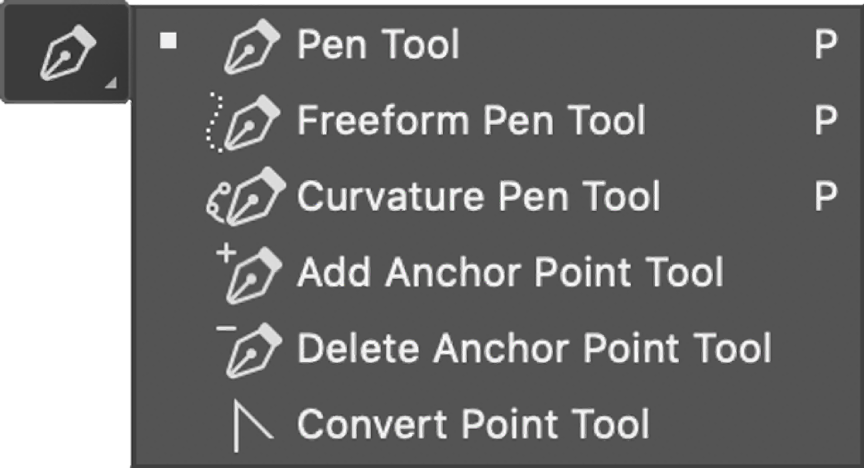
Fig 3 – Pen tools
The basic Pen tool gives you full control and precision and allows you to create straight or curved segments. The Freeform Pen tool operates very similarly to the Lasso tool except that it lays down a path instead of a selection. It does have a “magnetic” mode available too, via an option in the option bar. The Curvature Pen tool is a fairly recent feature addition, it lays down only curves as it’s name implies.

Fig 4 – Pen tool options bar
Figure 4 shows the Pen tool option bar, we will discuss some of these options later.
If you are wishing to create a path, ensure that the first drop down in the Pen tool options bar is set to Path.
To use the Pen tool to create a path, simply click or click and drag to add points to your path. A simple click will add a corner point (straight line segment), a click and drag will add a smooth corner point (curved segment). As with some of the selection tools, if you hover the cursor over the first point you will see the circle appear in the pen cursor, and a click will close the path.
As with the Brush tool and other tools, with the Pen tool you can hold down the [Shift] key to draw lines that are perfectly horizontal, vertical or at 45 degree angles.
When using the click-drag method to place curved segments it is easy to not quite put the anchor point in the exact right position. If you are yet to release the mouse button from the click-drag operation you can hold down the [Spacebar] to move the anchor point just placed.
The Add Anchor Point and Delete Anchor Point tools do exactly what their name implies either adding or deleting a new anchor point into an existing path. However, if you have the Auto Add/Delete option checked in the option bar you don’t need them. With this option checked, if you hover the Pen tool over an existing anchor point you’ll notice the minus sign appear in the Pen tool cursor, and clicking the anchor point will delete it. Also, with this option checked, if you hover the Pen tool over a path segment you’ll see the plus sign appear in the Pen tool cursor, and clicking the anchor point will add a new anchor point.
Checking the Auto Add/Delete option is much easier than having to change tools, so I would recommend it.
The Convert Point tool is used to convert a smooth point to a corner point and vice versa. However when using the Pen tool, if you hold down the [Option/Alt] key, the Pen tool function changes to that of the Convert Point tool, which again is easier than changing tools via the toolbar.
To convert an existing anchor point that has no direction lines/handles to a smooth point, with the Pen tool active, hold down [Option/Alt], hover the Pen tool over the anchor point (the cursor will change to the Convert Point tool), now drag the anchor point to create the smooth curve.
To convert a smooth anchor point to a sharp point (no direction lines/handles) with the Pen tool active, hold down [Option/Alt], hover the Pen tool over the anchor point (the cursor will change to the Convert Point tool), now click the anchor point to convert it to a sharp corner anchor point.
To split the direction lines/handles on a smooth anchor point with the Pen tool active, hold down [Option/Alt], hover the Pen tool over one of the direction handles (the cursor will change to the Convert Point tool), now drag the direction handle to split the direction handles so each can be moved independently. Continue using the Convert Point tool to drag the now independent direction handles.
The Path Selection Tools
The other tools that are used with paths are the Path Selection tool and the Direct Selection tool (shortcut key A). Again, you can work more efficiently by using key modifiers with the Pen tool, rather than changing tools via the toolbar.
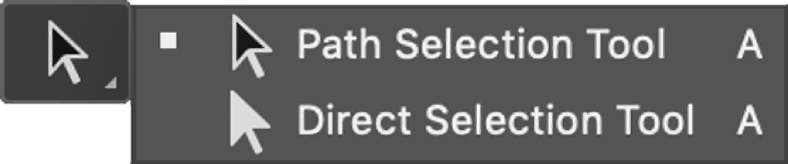
Fig 5 – The Path Selection tools
The Path Selection tool is used to select an entire path, the Direct Selection tool is used to select parts of a path (eg anchor points, line segments etc).
Holding the [Command] key on Mac or the [Control] key on PC while using the Pen tool will change the function to the Direct Selection tool.
Holding the [Command+Option] keys on Mac or the [Control+Alt] keys on PC whiles using the Pen tool will change the function to the Path Selection tool. T
o select an entire path, simply click the path using the Path Selection tool (or Pen tool while holding the [Command+Option] keys on Mac or the [Control+Alt] keys on PC).
To select a single element of a path simply click the path element using the Direct Selection tool (or Pen tool while holding the [Command] key on Mac or the [Control] key on PC).
To select multiple elements of a path use the Direct Selection tool while also holding the [Shift] key.
Once you have the required part of the path selected (or the whole path selected if that is what you want), move the selected elements around with the Direct Selection tool.
Pen Tool Options
Clicking the cog/gear on the Pen tool options bar will display the Path Options dialog box, shown in Figure 6.
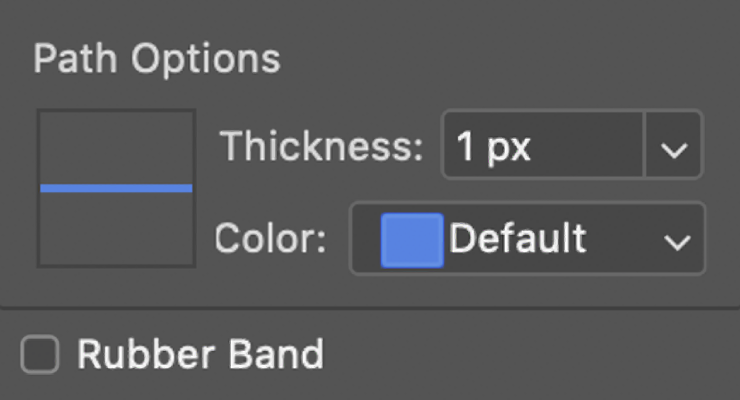
Fig 6 - Path Options dialog
Here you can change the colour of, and the thickness of, the lines used to display a path.
You can also choose to enable the Rubber Band option. This causes a predictor line to be drawn showing the likely path that will be created when you click. This can be useful when learning to use the Pen tool.
Creating Selections from a Path
To create a selection from the current path click the Selection button in the Pen tool option bar. This will cause the Make Selection dialog box shown in Figure 7 to display where you can choose options for the selection. Press OK to create the selection
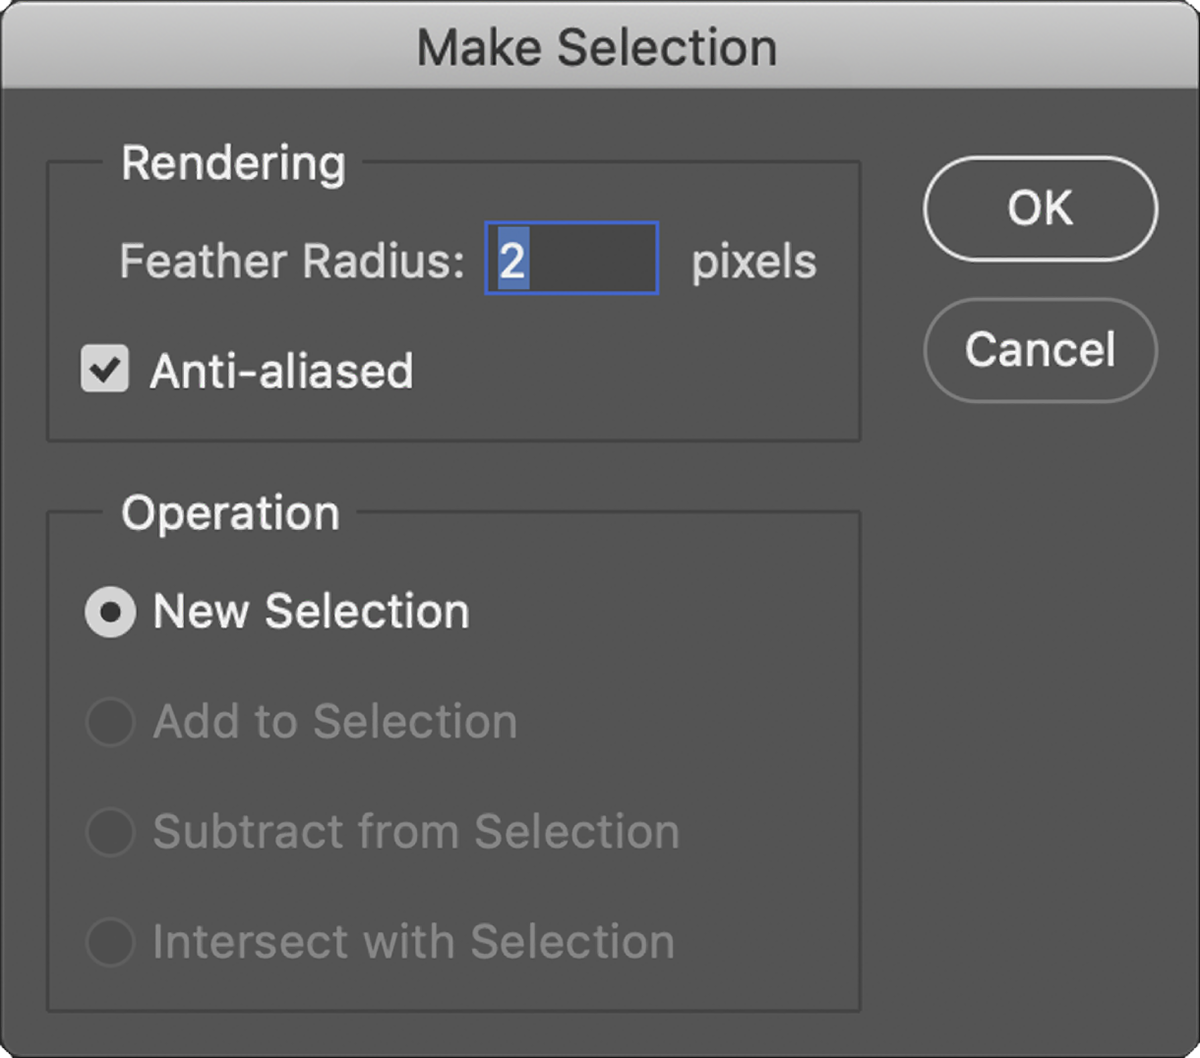
Fig 7 - Make Selection dialog
Summary
The Pen tool is a difficult tool to use, it takes a lot of getting used to. But that effort is well worth it. Only practise will get you there!
Stay tuned for part two of this article where we will explore some other aspects and options for Photoshop paths.
This article was first published in the February 2019 issue of Artists Down Under magazine.