In the Adobe Camera Raw (ACR) release last October (2017), Adobe added a very powerful feature called Range Masking. At the same time the feature was also added to Lightroom, so this article is equally appropriate to both ACR and Lightroom.
In ACR, you use one of three tools to make local (as opposed to global) adjustments to your image. These tools are the Adjustment Brush, the Graduated Filter and the Radial Filter. Once you have created a local adjustment with any of these tools, you can use the Range Mask feature to refine the mask for the local adjustment.
The Range Mask options can be found at the bottom of the tool panel when using one of the above tools, so depending on your screen real estate you may need to scroll the panel down to find them.
By default the Range Mask drop-down is set to None, so it is disabled.
Please note that the drop-down will not be active until you have used the local adjustment tool to create a mask.
Range Mask Refinement by Color
To refine the mask based on colours in the image, choose Color from the Range Mask drop-down.
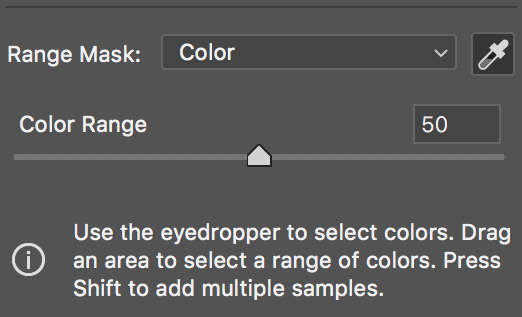
Figure 1 - Color
Use the Eye-dropper to sample colours from your image, the mask will be refined by selecting only these colours. You can click the eye-dropper to choose a single colour point, or you can click-drag it over a larger area for a more accurate selection. Once you have chosen your first colour selection, you can hold down the Shift key and Shift-click, or Shift-click-drag up to another four colour points (five in total).
To remove one of the eye-dropper sample points, hold down the Alt(Option) key (the eye-dropper will change to scissors) and click the sample point.
To exit colour sampling mode, click the Eye-dropper icon (to the right of the Range Mask drop-down), or press the Esc key.
The Color Range slider, decides how narrow or broad the color range selected is. Move the slider left to narrow the range (only colours very close to the points sampled will be included), or move the slider right to broaden the range of colours selected.
Holding down the Alt(Option) key will moving the slider will give you a black and white “mask view” of your adjustment mask.
Range Mask Refinement by Luminance
To refine the mask based on luminance (brightness) values in the image, choose Luminance from the Range Mask drop-down.
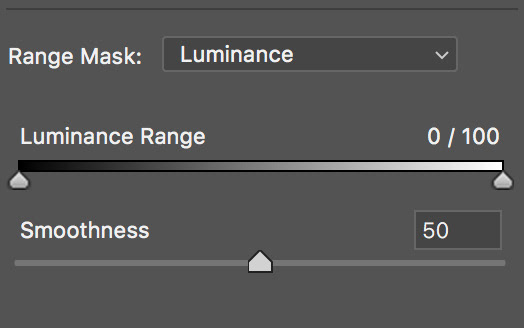
Figure 2 - Luminance
To exclude darker areas from your adjustment slide the left slider to the right.
To exclude lighter areas from your adjustment slide the right slider to the left.
Use the Smoothness slider to feather the adjustment.
Holding down the Alt(Option) key will moving the slider will give you a black and white “mask view” of your adjustment mask.
Summary
With any one adjustment you can only choose either Color or Luminance, not both. Don’t forget though you can make as many adjustments as you like with the Adjustment Brush, Graduated Filter and Radial Filter, and each of these adjustments can be refined with the Range Mask option.
This is a very powerful feature that Adobe have introduced, have a play with it you will be amazed.
This article was first published in the June 2018 issue of Artists Down Under magazine.