Adobe have introduced some changes to the Gradient tool in Photoshop 2023.
The Gradient tool is used to draw gradients (transitions from one colour or tone to another) that can be very useful for colourisation, adding lighting effects or creating layer masks, amongst other things.
Figure 1 shows the location of the Gradient tool on the toolbar as well as the Options bar for the new Gradient tool. The first change you’ll note is the dropdown towards the left of the Options bar where you can choose the new Gradient tool (the default) or the old Classic Gradient tool.
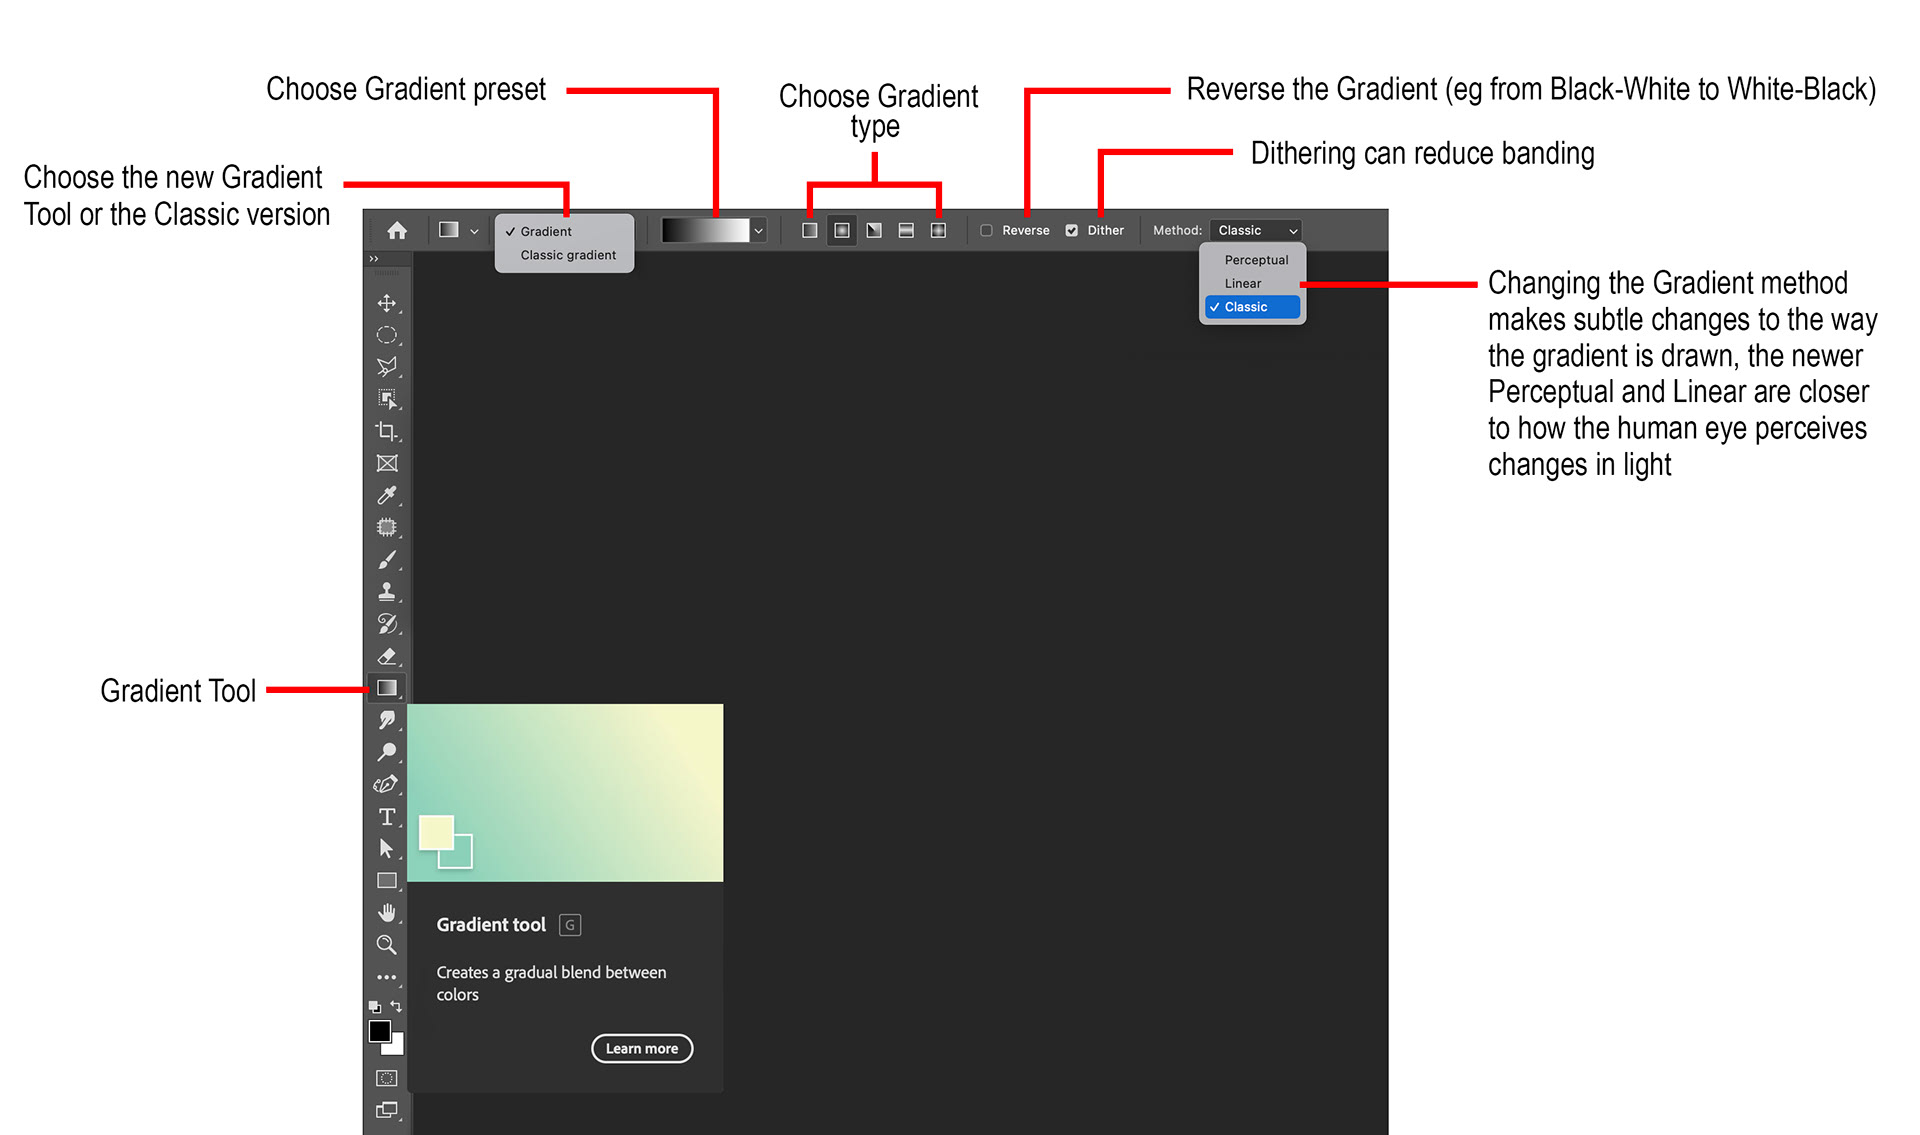
Figure 1 - New Gradient Tool with Options bar
The other options shown in the Options Bar have not changed with the PS 2023 update and are used in the same way.
If you want the Gradient tool to operate as it always has, choose Classic Gradient from the drop-down, in this case you’ll note that you have a few extra settings in the Options bar – Blend Mode, Opacity and Transparency – see Figure 2.
It is worth noting the Method drop-down which was a recent change too (in Photoshop 2022). This change offered two additional gradient interpolation methods (Perceptual and Linear) that are designed to create smoother gradients that are more in line with the way the human eye perceives light in the natural world. Perceptual is the new default value, but it might be worth experimenting with this setting for very fine control over the gradient.

Figure 2 - Classic Gradient Tool Options bar
The first and most obvious behaviour difference with the new Gradient tool is when you are drawing gradients on pixel layers. With the old tool the gradient would destructively just draw onto the pixel layer, with the new tool a Gradient Fill adjustment layer is automatically created. One advantage with this approach is that it is much easier to fix mistakes – for example, with the old tool if you had drawn a gradient and had the wrong type selected (eg linear instead of radial) then you’d have to undo and start again, with the new tool you can simply change the type by clicking the relevant icon in the Options bar and the gradient will be redrawn.
The Gradient Fill layer now offers gradient settings in the Properties panel as well as a direct on-screen control with which to change the gradient, allowing much easier repositioning and changing of the gradient, with live updates on screen.
The on-screen control also makes it much easier when applying lighting effects, or when creating layer masks because as you move/drag the gradient control the gradient is updated and the effect on the image can be seen live on your image.
Figure 3 shows the five different gradient types and the format of the on-screen controls for each. Figure 4 shows a Gradient Tool in use.
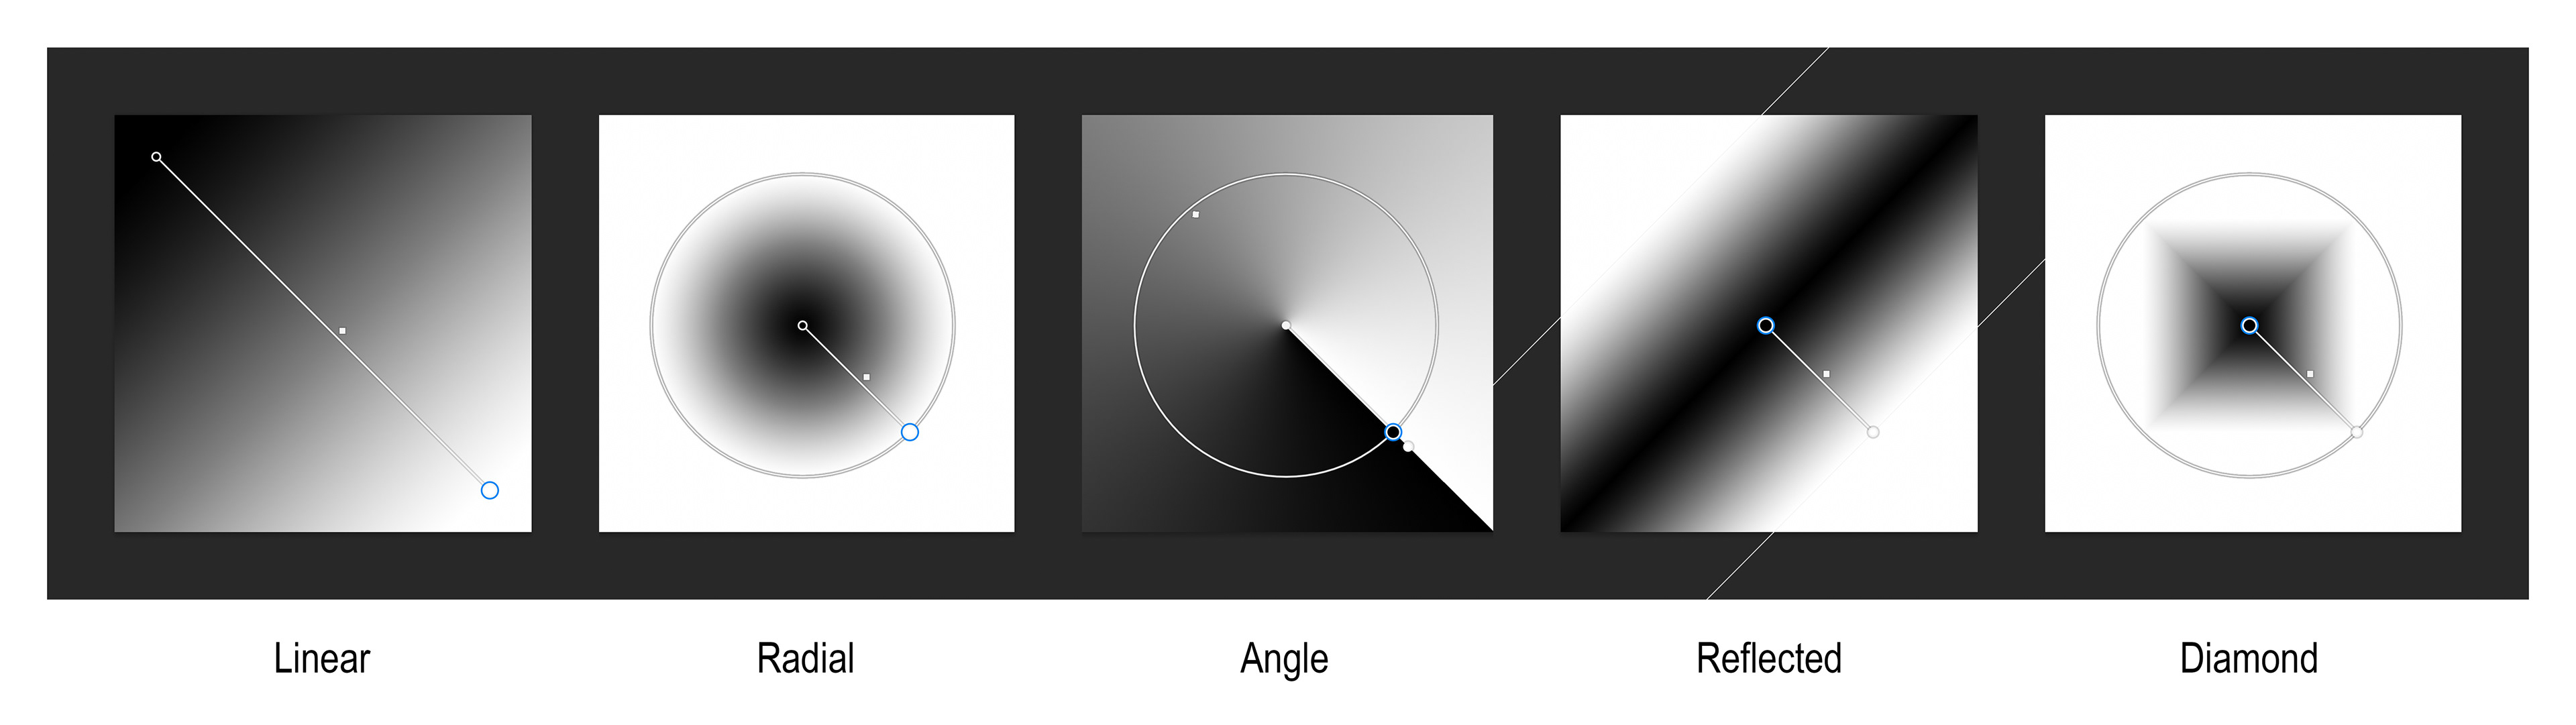
Figure 3 - The five types of gradient
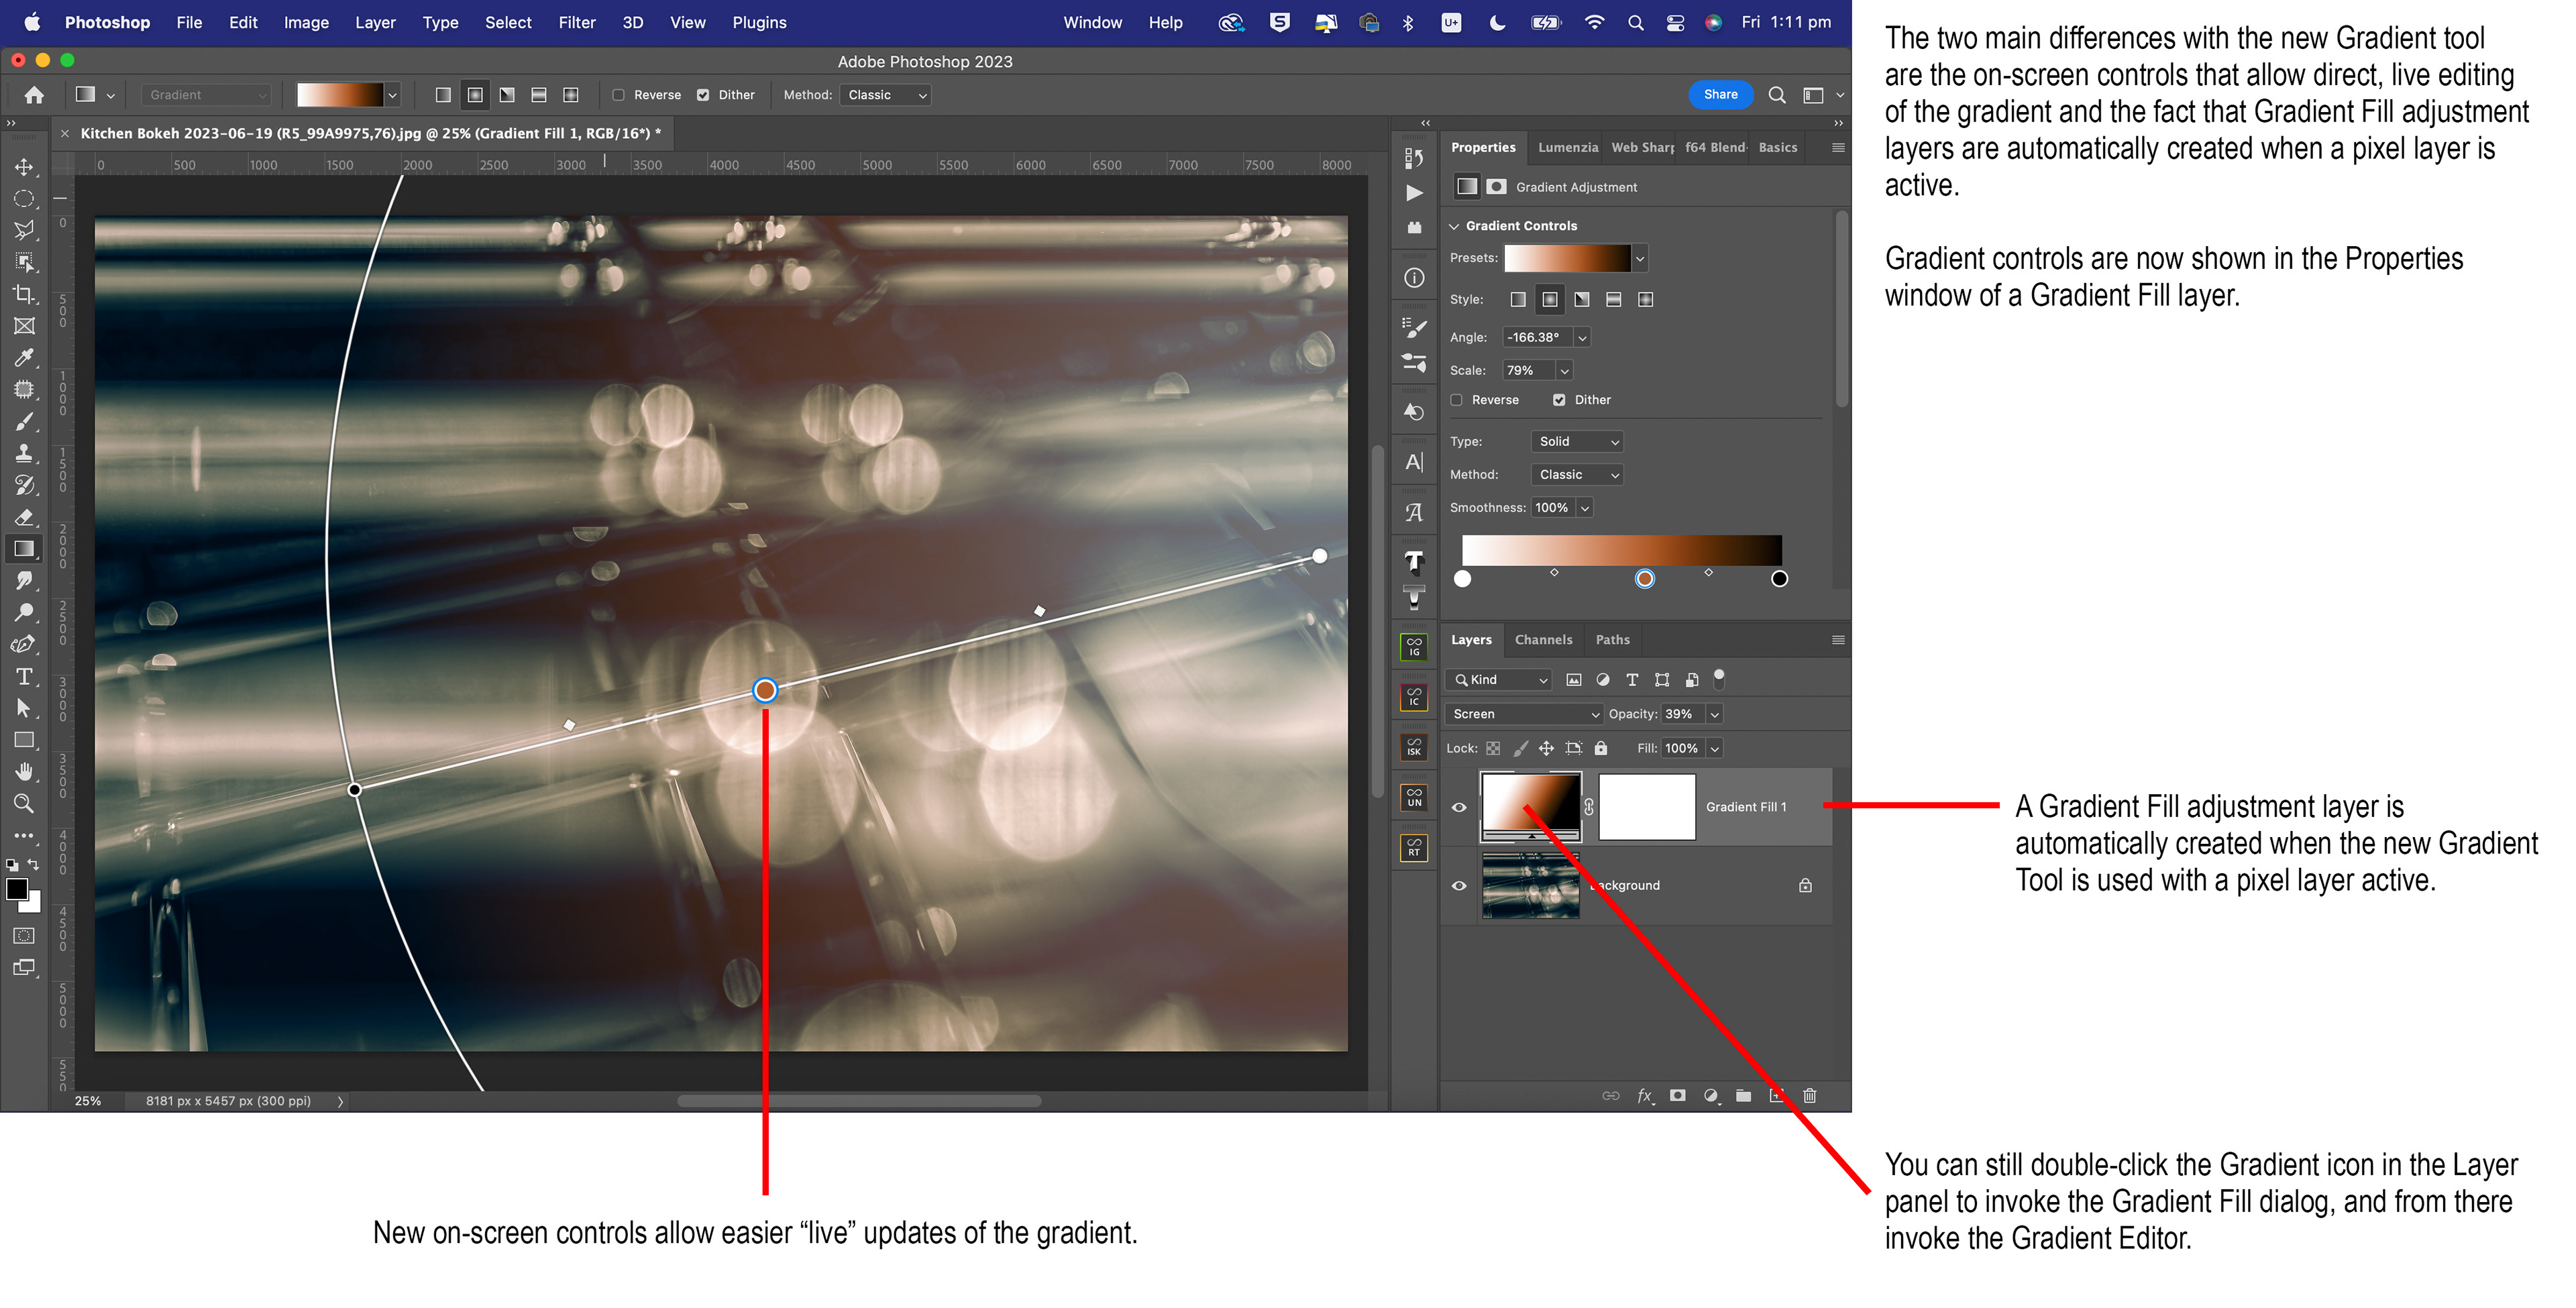
Figure 4 - Gradient tool in use
To change the position and size of the gradient just click and drag the end points of the control (or the circle or line). The colour stops will be shown by circles on the gradient line, double-click one of these to bring up the colour picker to change the colour of that stop. Between each colour stop you’ll see a small diamond shaped control, dragging these along the line will change the transition between the two colours. To add a colour stop position the mouse cursor onto the line (it will change to a triangle with a + sign) and click. To remove a colour stop just drag it down off the line. You can interact with the colour stops in the Properties panel in the same way, but will have to select (click) a colour stop in order to see the two diamond shaped controls either side of it.
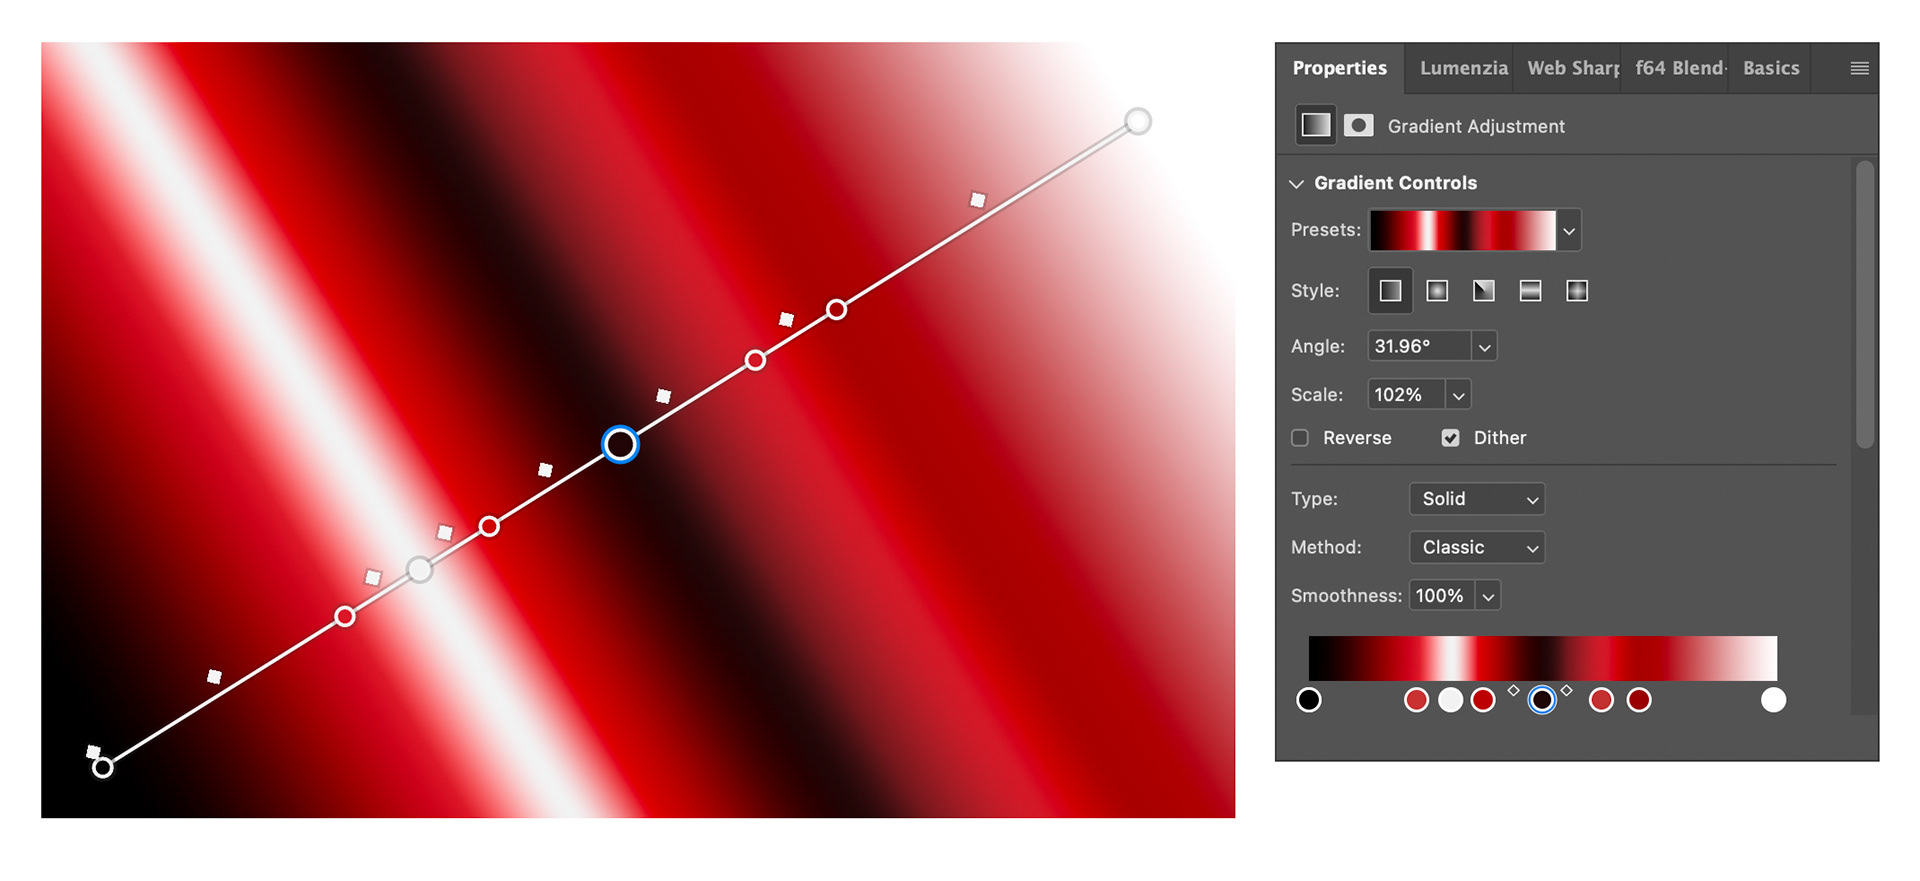
Figure 5 - Gradient with multiple colour stops
If you wish to create subsequent gradient fill layers (perhaps to blend together with blend modes or masks), you can first create a new blank layer (Shift+Cmd/Ctrl+N) then draw again with the gradient tool. Alternatively you can select Gradient from the New / Fill Layer menu or click on the “Create new fill or adjustment layer” icon in the Layer panel and choose Gradient.
A very common use for drawing gradients is on layer masks, and here too you will get the on-screen control for easier manipulation of the gradient if you have the new tool selected. With layer masks though you don’t get the Gradient controls in the Properties panel, and if you’re drawing multiple gradients with white-to-transparent, or black-to-transparent settings on the one layer mask (like Figure 6) you will only see (and be able to modify) the control for the most recent one drawn.
A very common use for drawing gradients is on layer masks, and here too you will get the on-screen control for easier manipulation of the gradient if you have the new tool selected. With layer masks though you don’t get the Gradient controls in the Properties panel, and if you’re drawing multiple gradients with white-to-transparent, or black-to-transparent settings on the one layer mask (like Figure 6) you will only see (and be able to modify) the control for the most recent one drawn.
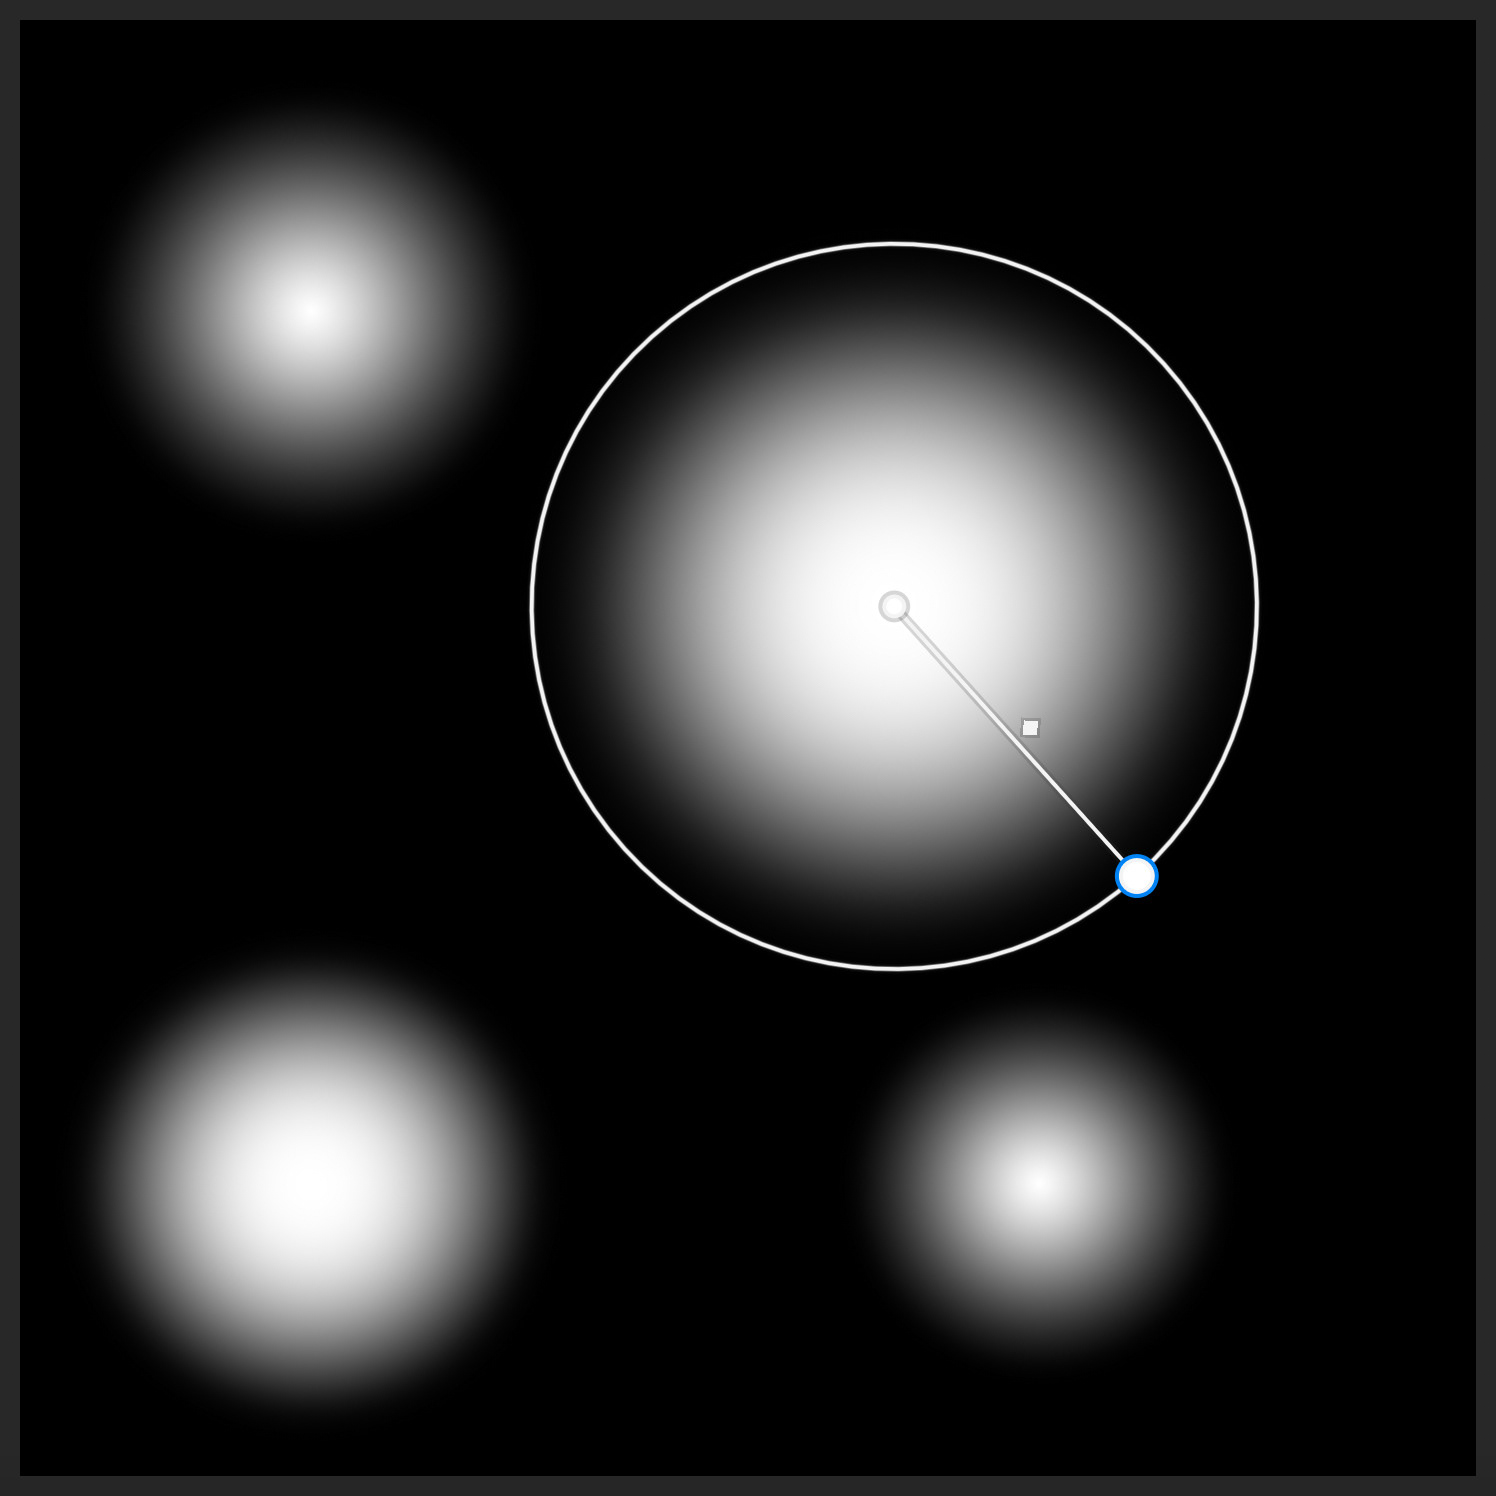
Figure 6 - A layer mask created using the Gradient tool
You can still double-click the Gradient icon on a Gradient Fill layer in the Layer panel to invoke the Gradient Fill dialog, and then double-click the Gradient there to invoke the Gradient Editor (see Figure 7).
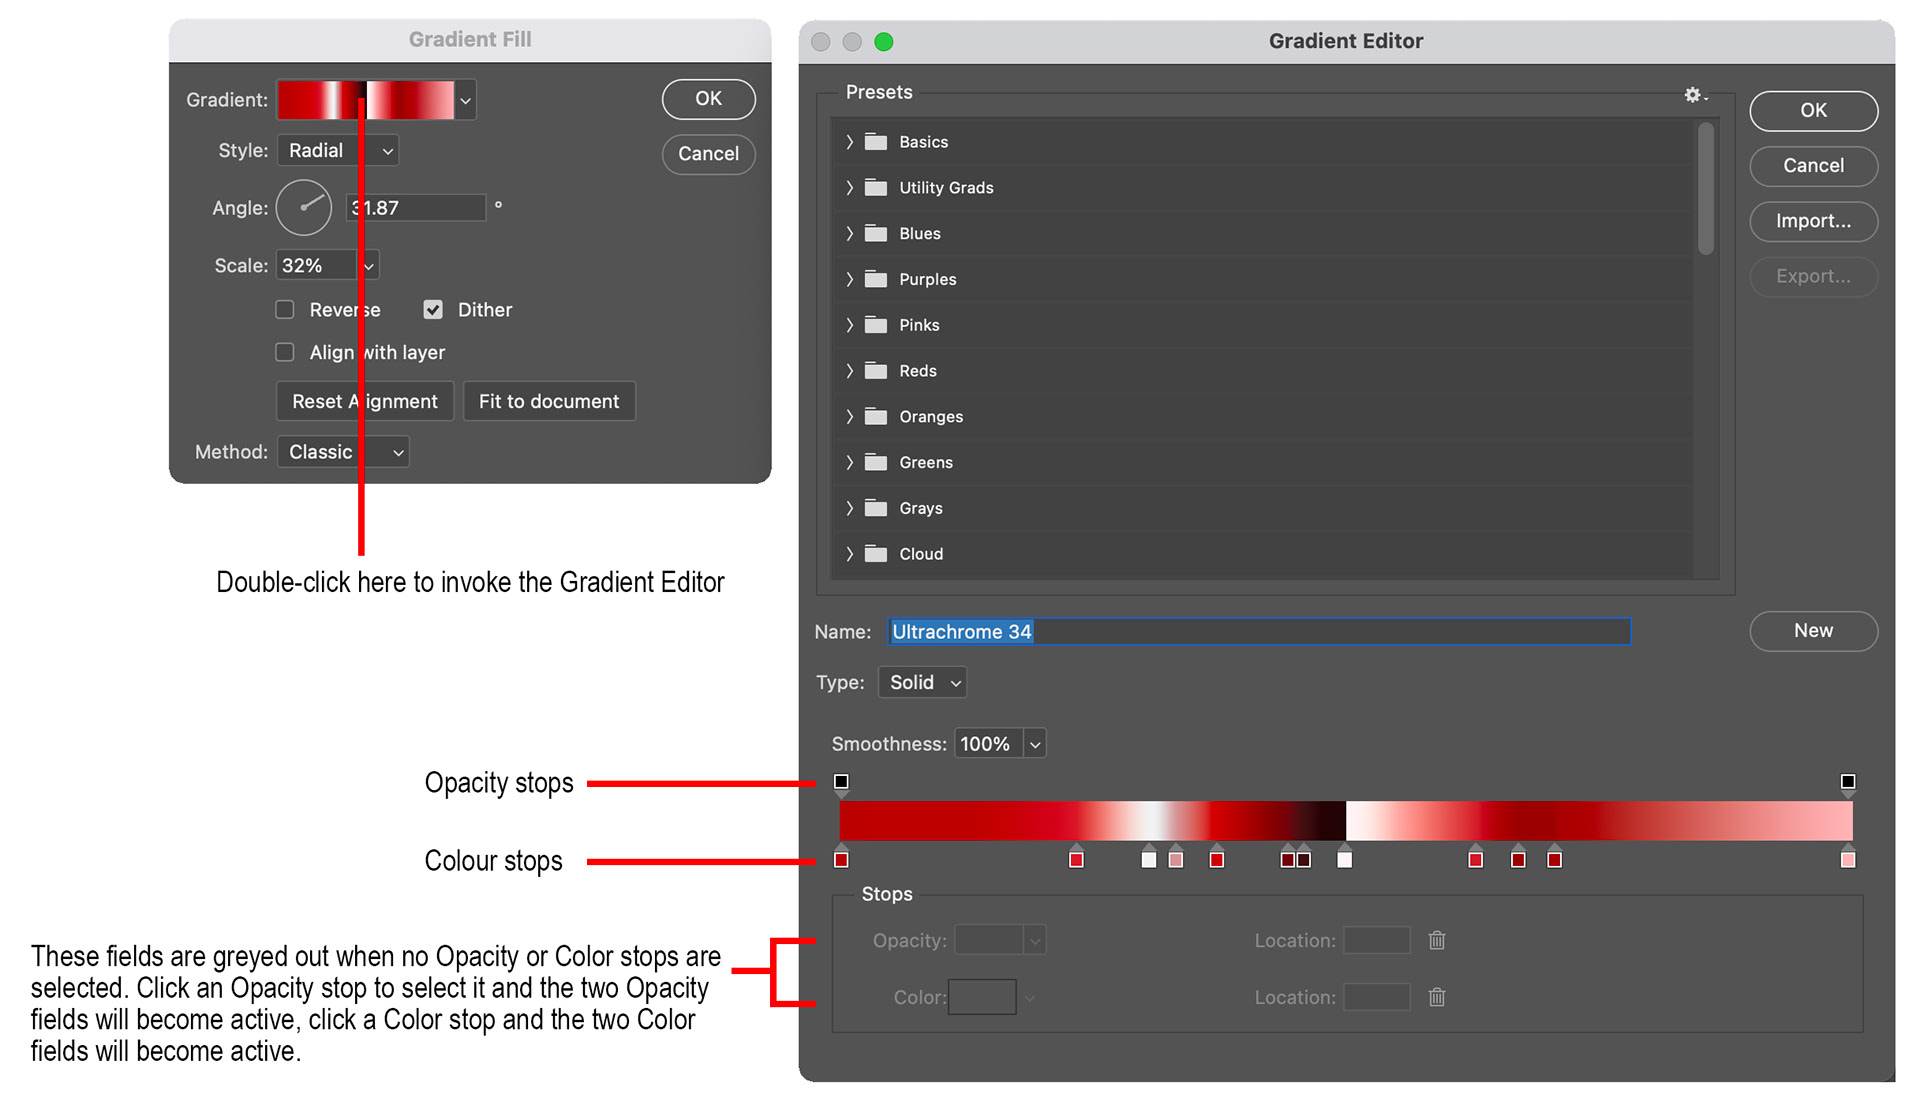
Figure 7 - Gradient Fill and Gradient Editor dialogs
The Gradient Editor is required if you wish to change the opacity of the gradient (eg to make it transparent), or if you wish to modify and save your own Gradient presets.
In the Gradient Editor the circular controls below the gradient are the Color Stops, those above the gradient are the Opacity Stops which allow you to make a gradient transition from completely opaque (100%) to completely transparent (0%).
One other little trick that you may not be aware of is the placing of two colour stops at the same location (ie on top of each other), this allows you to create a hard transition from one colour to another, rather than a gradation. Other than the obviousness of the hard line between the two colours, another thing that makes this technique obvious is that the little diamond that normally shows between the two stops appears on top of one (see Figure 8).
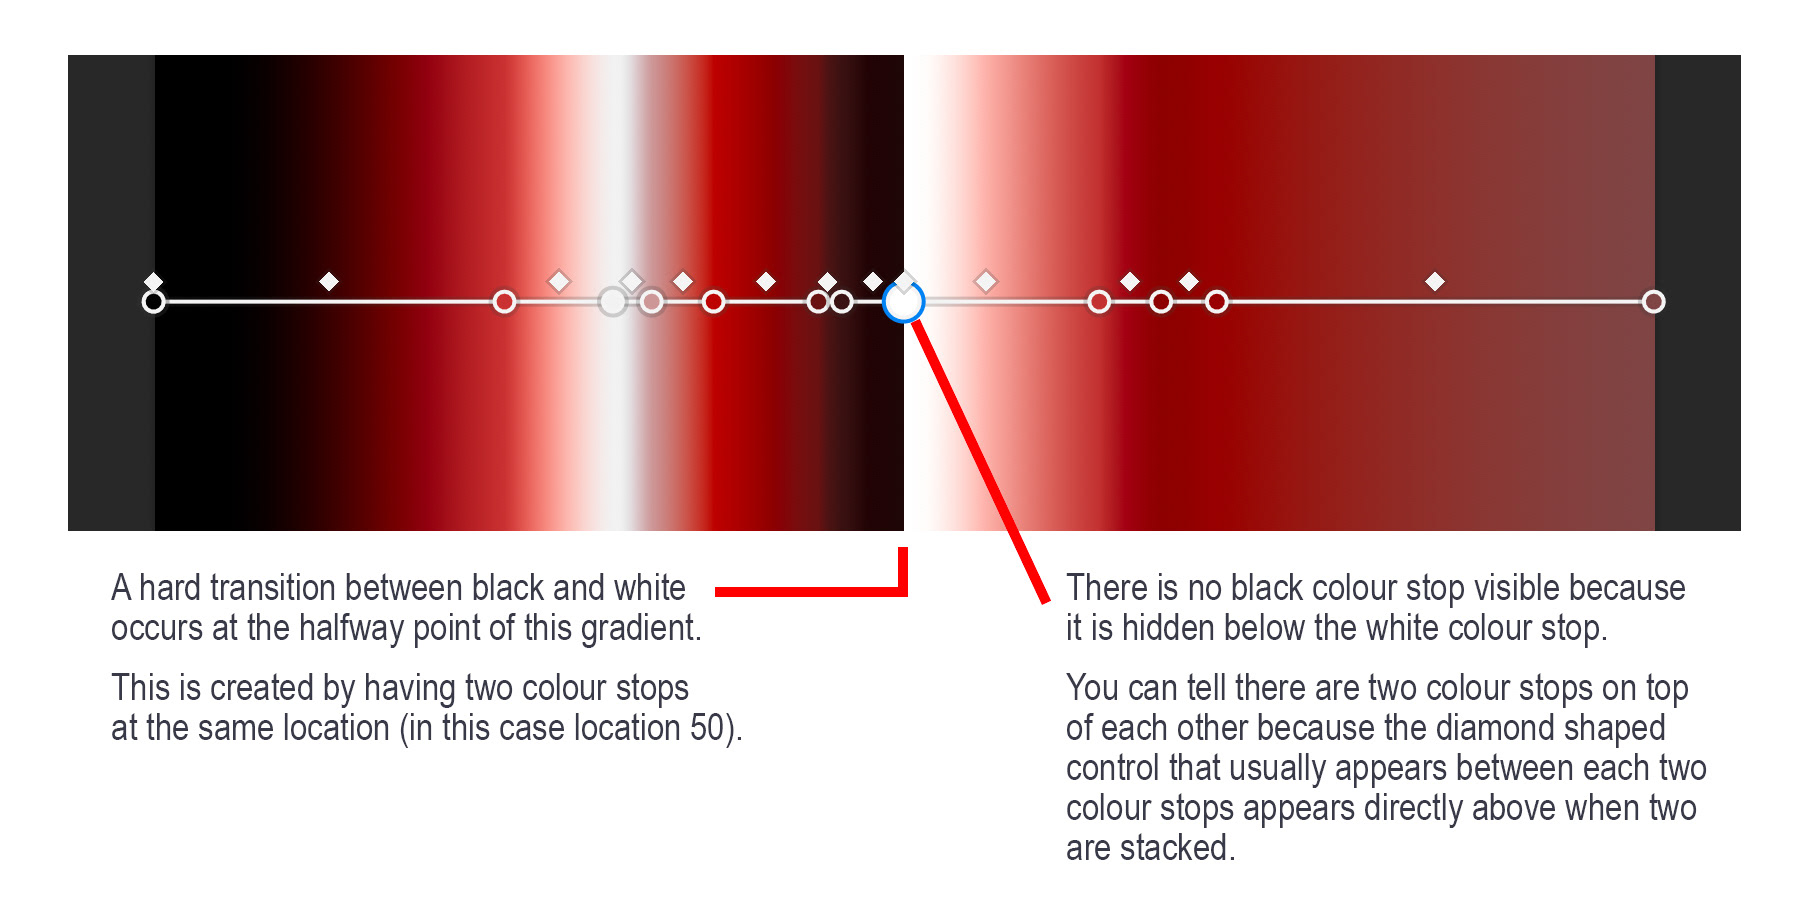
Figure 8 - A gradient with a hard colour transition
So, when might you want to use the old Classic Gradient? For me it is really only when I’m drawing with multiple gradients on the one layer, or when you want to “draw” with gradients using different blend modes, this occurs for me when I am trying to create digital patterns, but otherwise might be rare.
Adobe have said they will continue to make improvements to other legacy tools in Photoshop - welcome news indeed.
This article was first published in the August 2023 issue of Artists Down Under magazine.