In part one of this series, we introduced colour channels and the idea of using them to create selections and masks, in this follow-up article we will learn a little bit more about the Channels panel and some ways we can manipulate channels to help us.
Figure 1 shows us the Channels panel, which we introduced in the first article
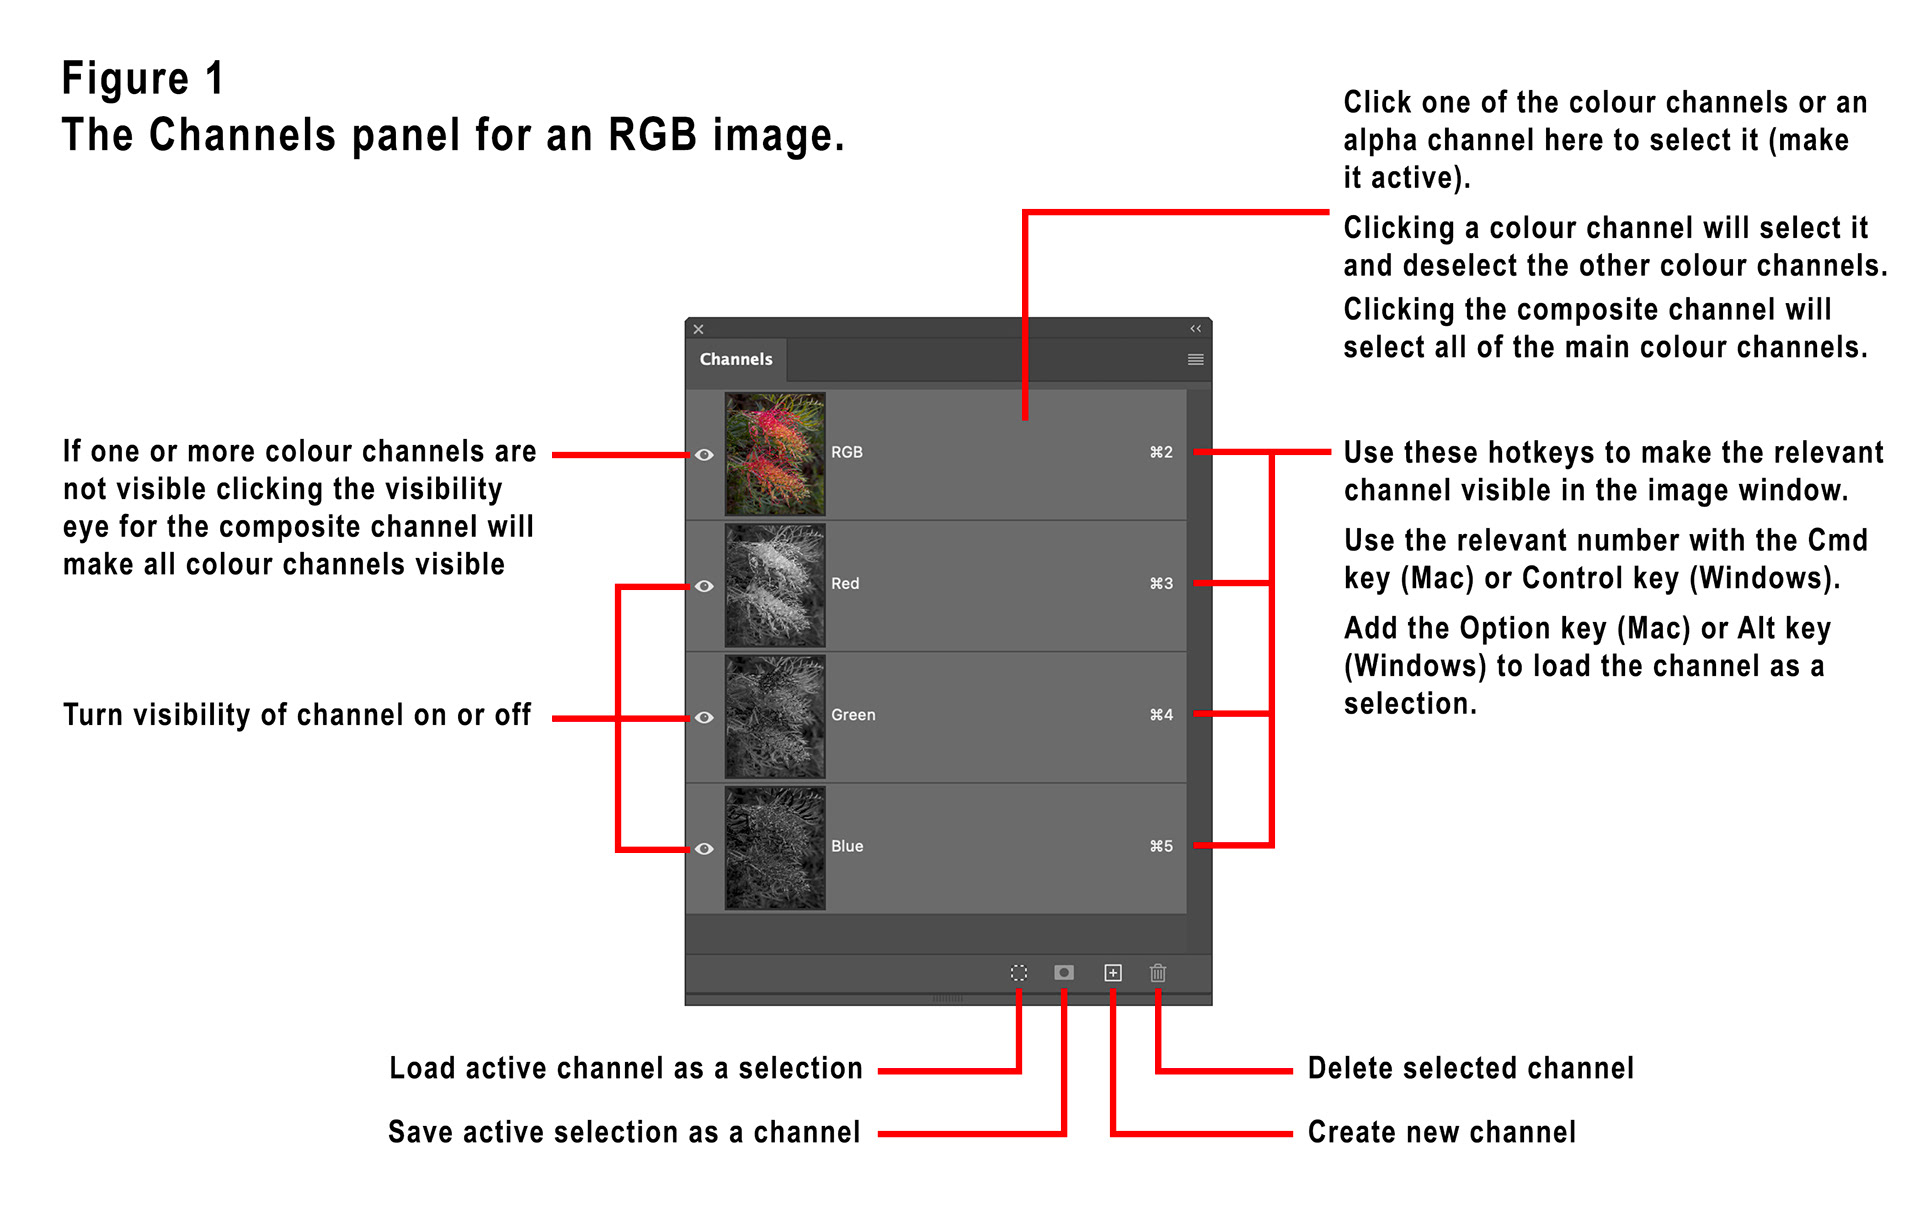
Use the visibility “eye” icons to turn the visibility of channels on and off. Note that making the composite channel “visible” turns on the visibility icons for all the default colour channels.
Click a channel to make it active. Clicking a colour channel will make it active and de-activate the other colour channels. Clicking the composite channel will select all the main colour channels.
As described in the last article, use the hotkeys shown to make a channel appear in the image window using the Cmd (Mac) or Ctrl (Windows) key. Add the Opt (Mac) or Alt (Windows) key to load the channel as a selection.
The four icons at the bottom of the Channels panel can be used to load the active channel as a selection, save the active selection as a channel, create a new channel or delete the active channel.
You can also delete a channel by right-clicking it and choosing Delete Channel.
It is always a good idea to create a duplicate of a colour channel before “messing” with it, modifying a colour channel directly will alter you image. You can duplicate a channel by right-clicking it and choosing Duplicate Channel or by dragging the channel onto the “Create a new channel” icon at the bottom of the Channels panel.
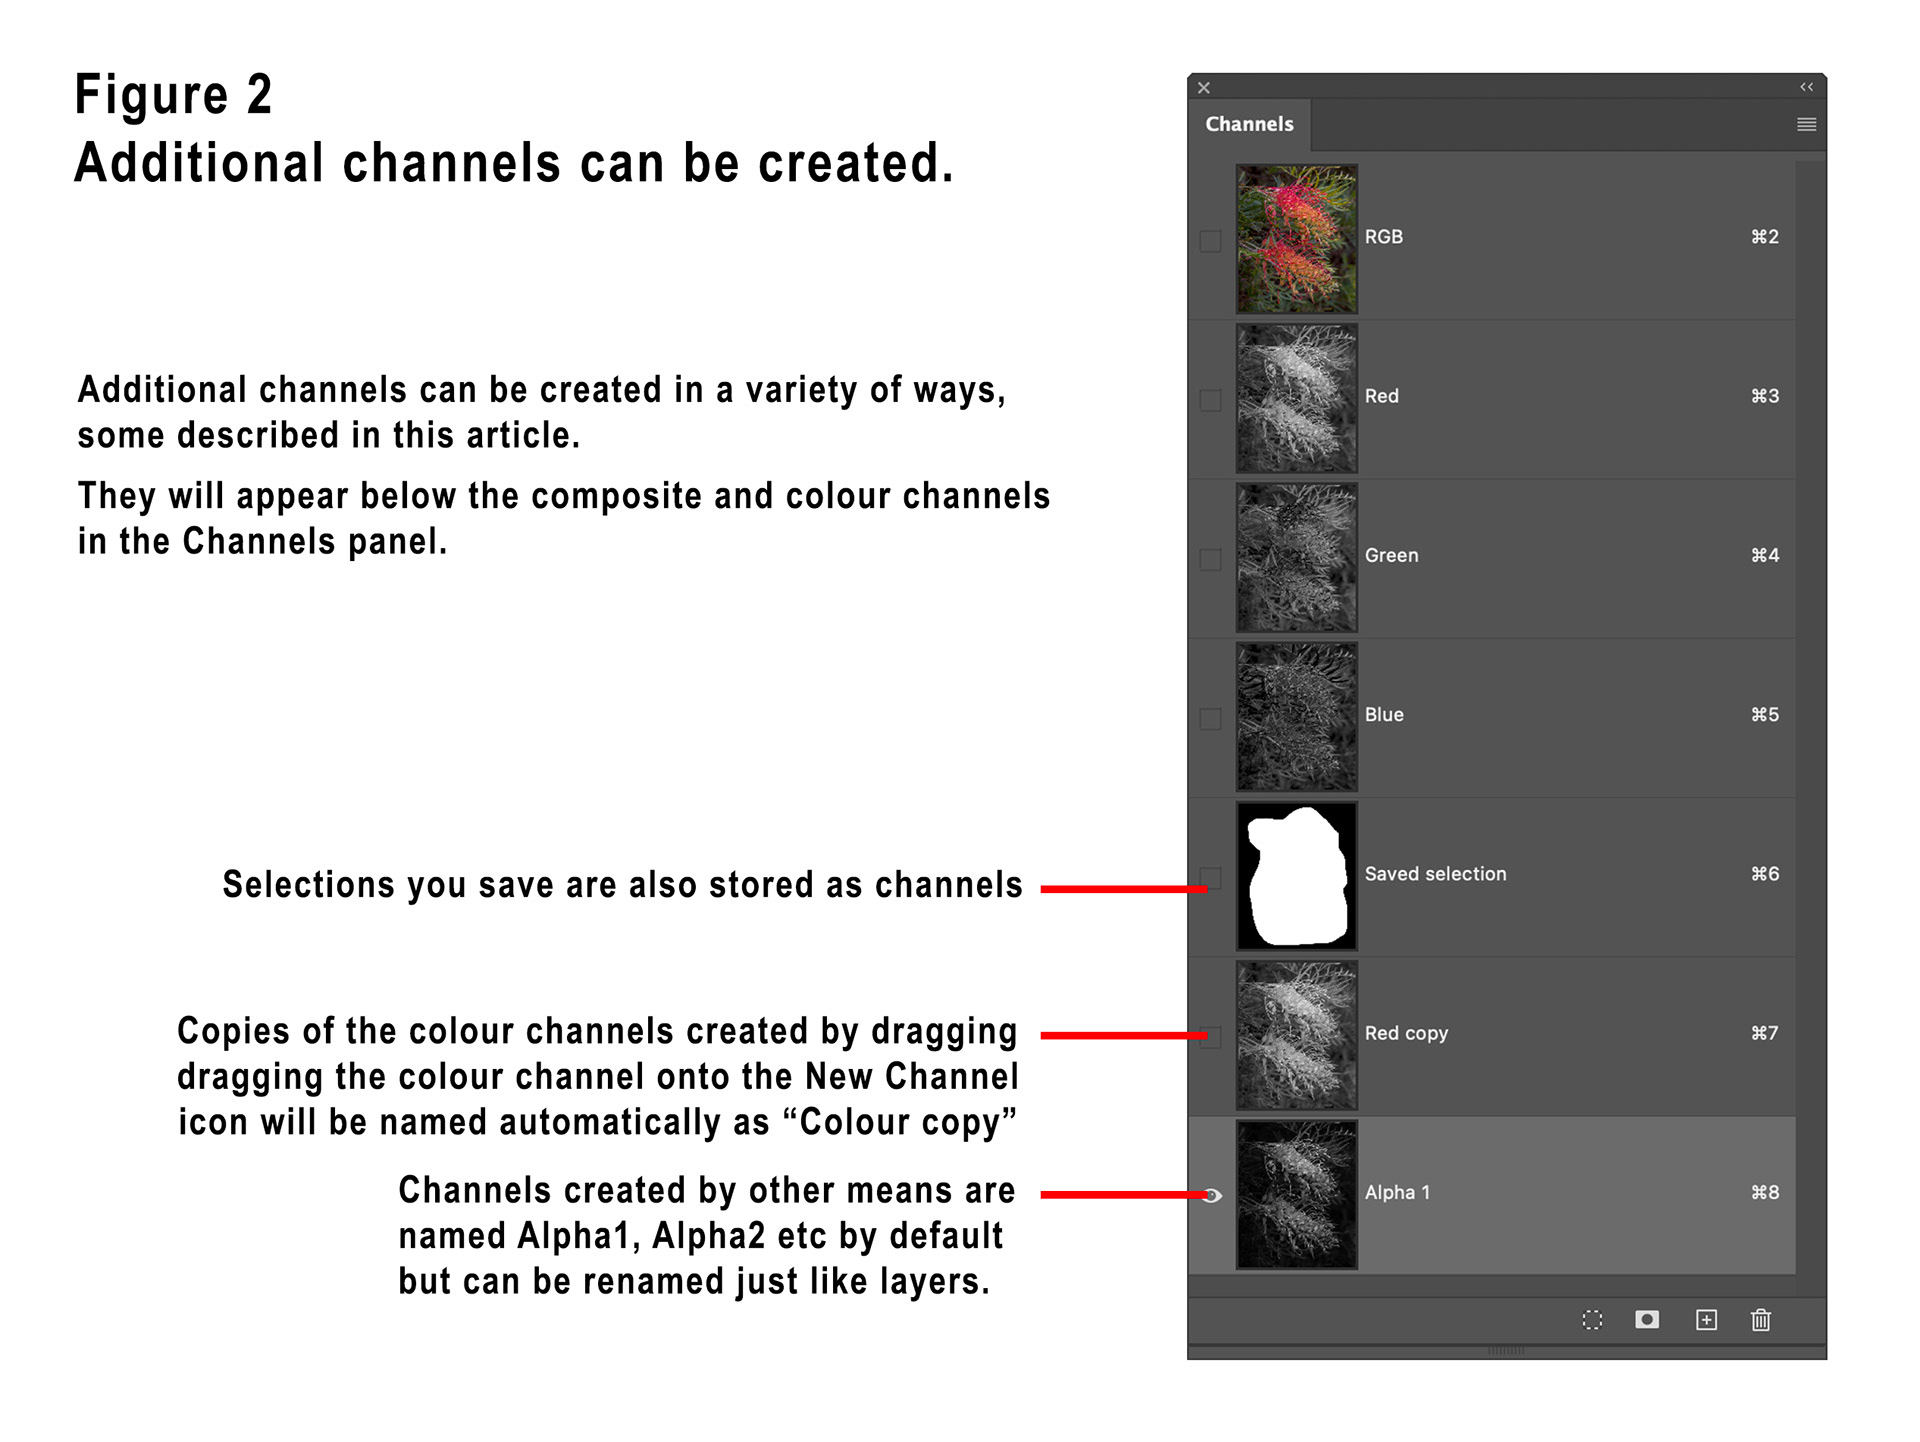
Additional channels can be created in a variety of ways; they will appear underneath the main colour channels in the Channels panel (see Figure 2). A channel is also created whenever you save a selection.
Apply Image and Calculations, both available on the Image menu in Photoshop provide two very valuable methods for manipulating channels.
Apply Image allows you to first select a target (which might be a layer, a layer mask or another channel) by making it active (ie clicking on it), then choose the Apply Image command where you can choose another channel from the same document, or another open Photoshop document, and “apply” it to the target.
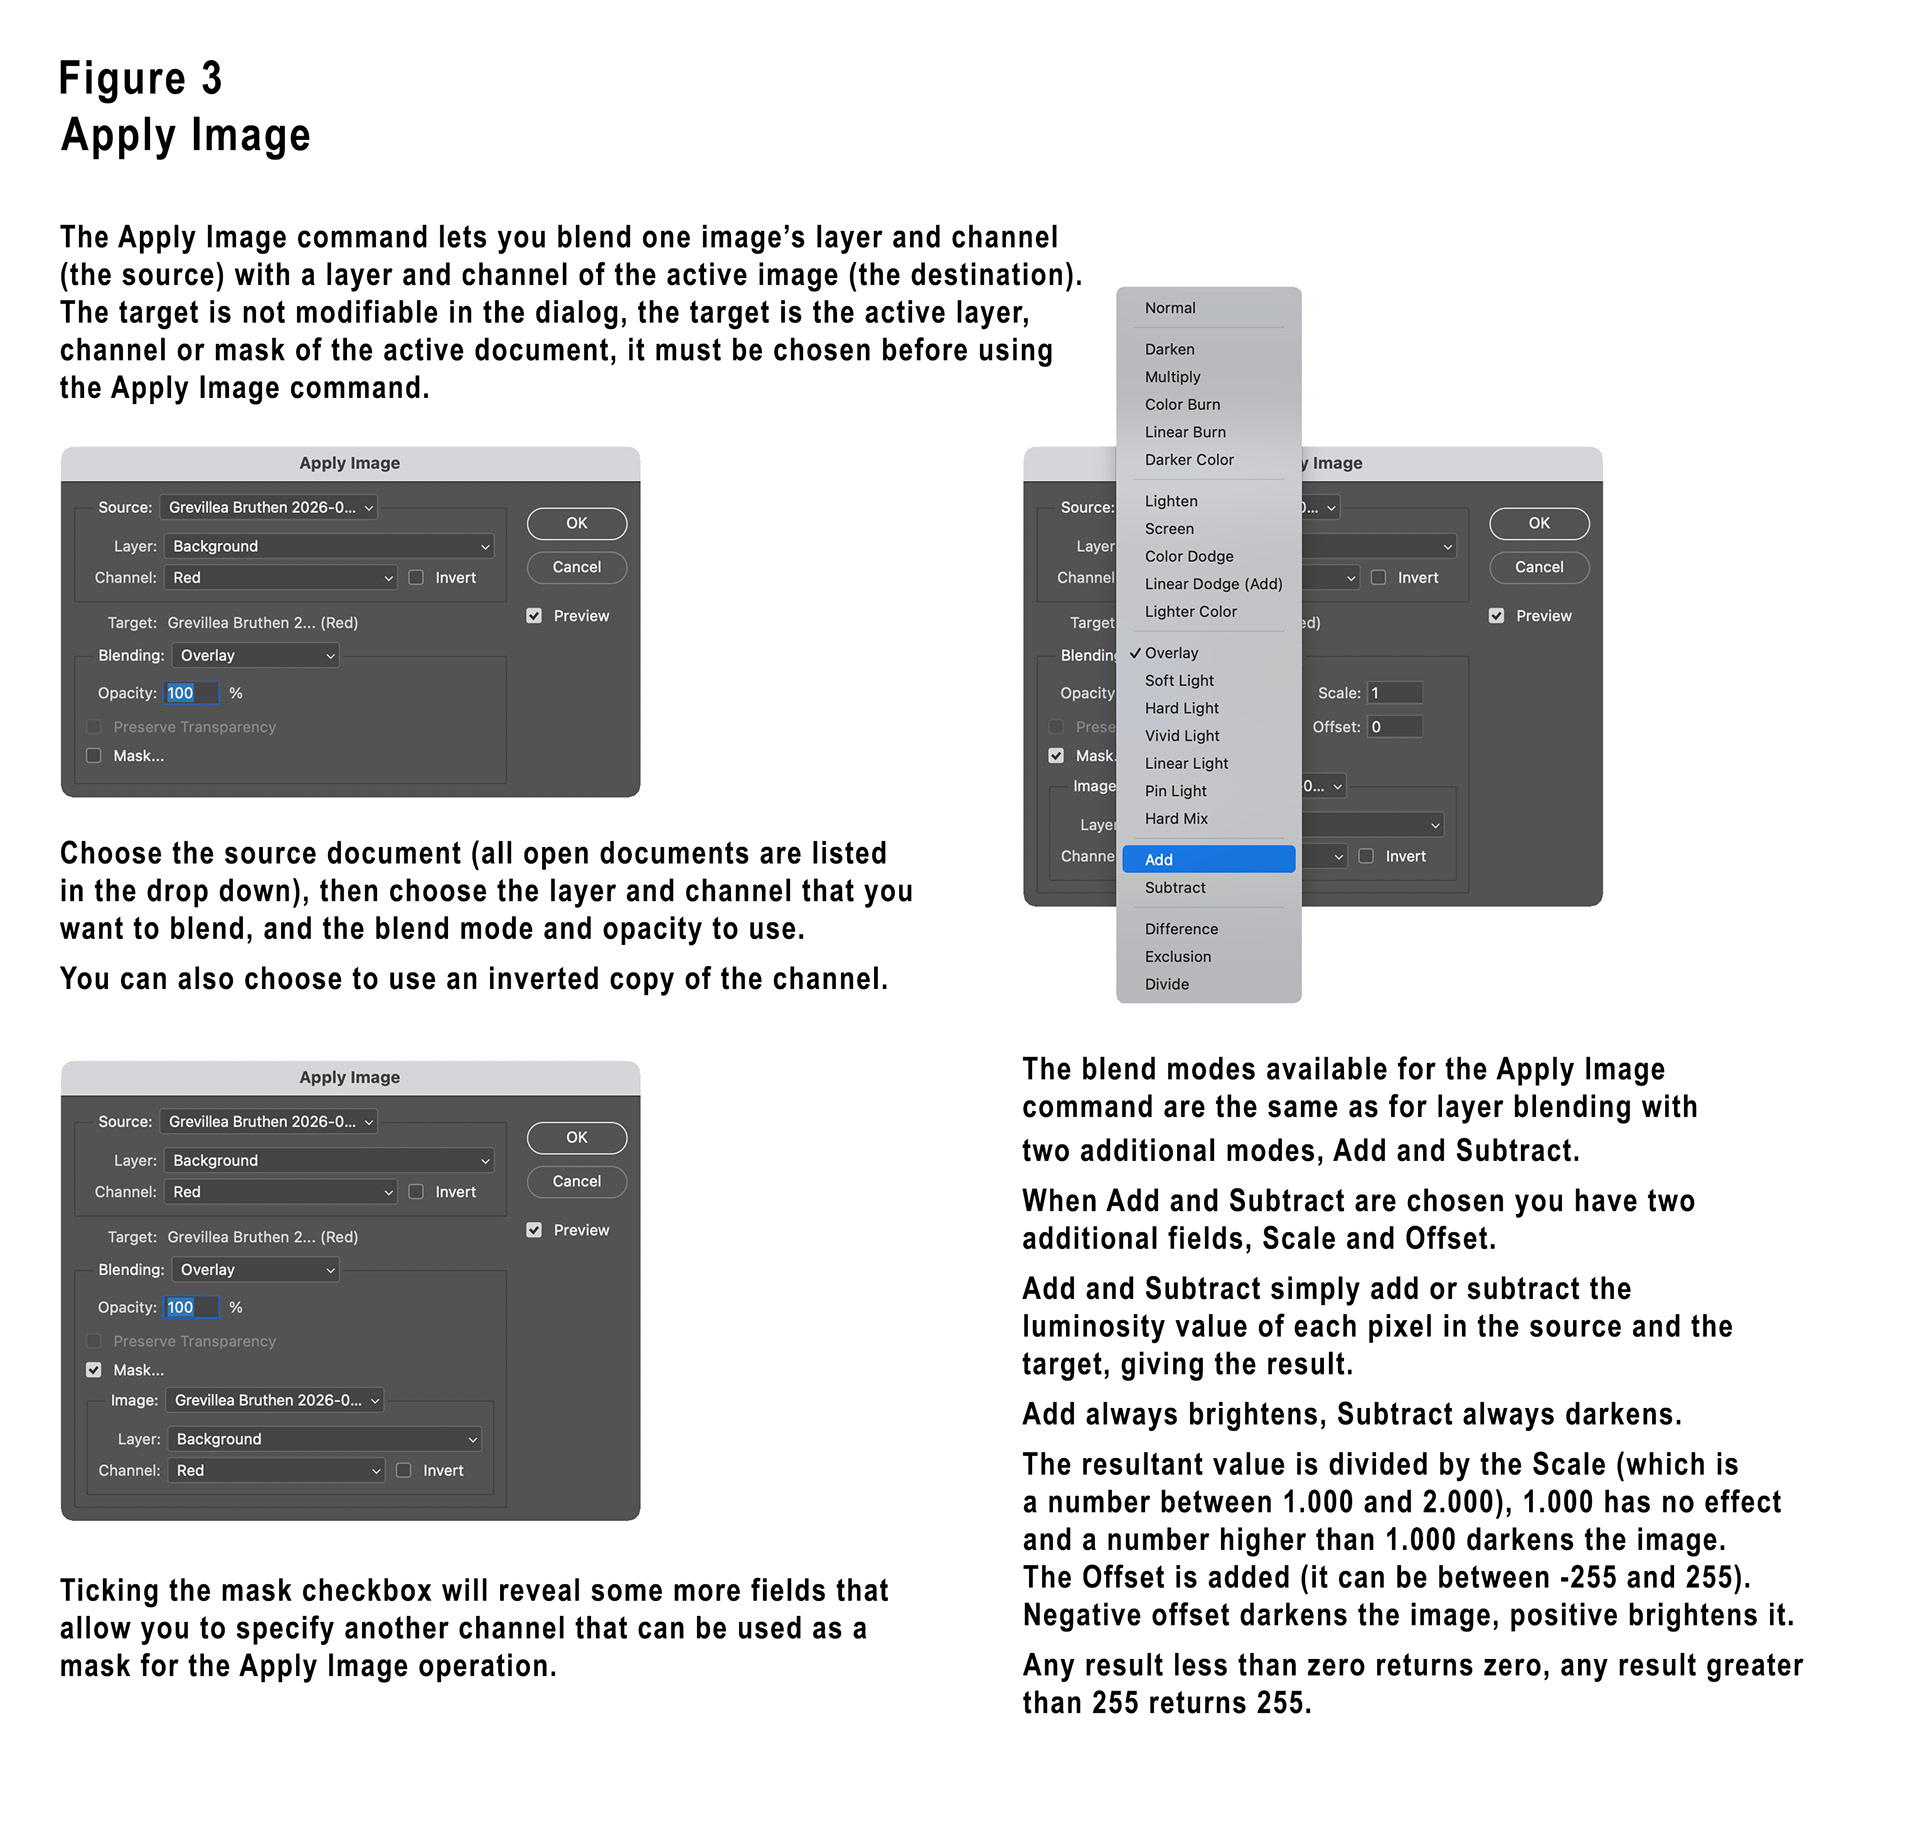
You can choose from any of the usual layer blend modes, that operate exactly as they do with layers. There are two additional ones, Add and Subtract.
When you select Add or Subtract blend modes, two additional fields are offered in the dialog box, they are Scale and Offset.
Add simply adds the luminosity value of each pixel in the source to the luminosity value of the corresponding pixel in the target. Luminosity values range from zero (black) through 255 (white), so the Add blend mode will always darken.
Once the values are added, the result is divided by the Scale (which can be a number between 1.000 and 2.000) and then the Offset (a number between -255 and 255) is added to give the result (which is set to zero if negative or set to 255 if above 255).
Subtract blend mode subtracts the luminosity values of the pixels in the source channel from the luminosity values of the corresponding pixels in the target. Identically to Add, the Scale and Offset values are applied and a number between 0 and 255 gives the resultant luminosity of each pixel. Subtract blend mode will always lighten.
Ticking the Mask check box allows the use of another channel to act as a mask for the channel blend.
The Calculations command operates in a similar fashion except you specify two source channels that are blended, you can choose to then save the result in a new document, in a new channel or as a selection.
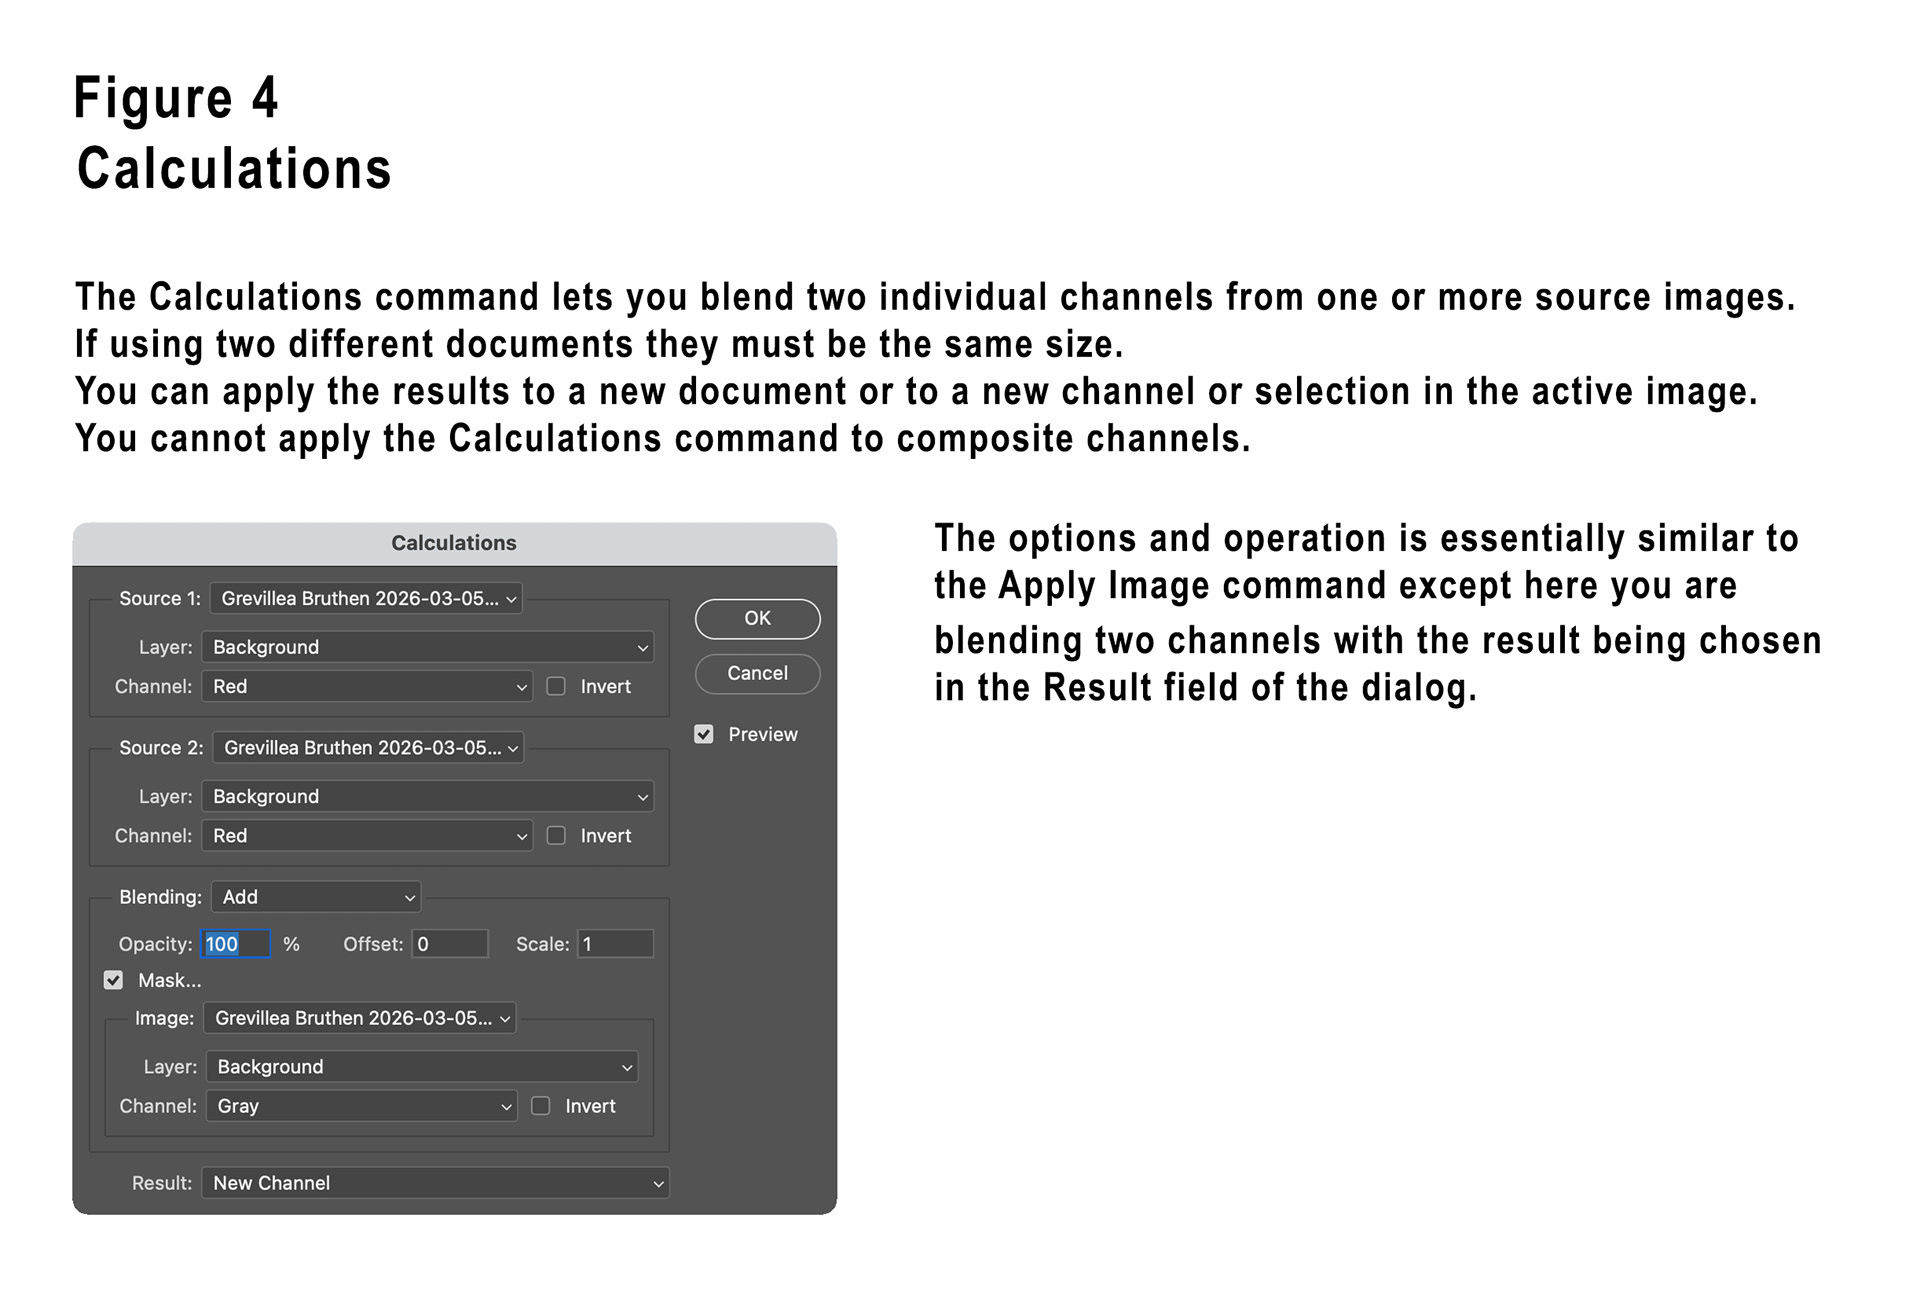
If you are blending channels from two different open documents, the documents must be the same pixel dimensions.
This can be useful if you want to utilise channels from a different colour mode. For example, if you are working on an RGB document but want to utilise a CMYK colour channel for a mask, you can duplicate your RGB document, change the image mode of the duplicate to CMYK, then use Calculations to blend the channel from the CMYK duplicate.
Here’s a few recipes for isolating colours in RGB images with Calculations;
Isolate Red
– Source 1 Blue Inverted, Source 2 Green Inverted, Blend Mode Multiply.
Isolate Green
– Source 1 Blue Inverted, Source 2 Green Inverted, Blend Mode Multiply.
Isolate Blue
– Source 1 Red Inverted, Source 2 Green Inverted, Blend Mode Multiply.
Isolate Cyan
– Source 1 Blue, Source 2 Green, Blend Mode Multiply.
Isolate Magenta
– Source 1 Red, Source 2 Blue, Blend Mode Multiply.
Isolate Yellow
– Source 1 Red, Source 2 Green, Blend Mode Multiply.
– Source 1 Blue Inverted, Source 2 Green Inverted, Blend Mode Multiply.
Isolate Green
– Source 1 Blue Inverted, Source 2 Green Inverted, Blend Mode Multiply.
Isolate Blue
– Source 1 Red Inverted, Source 2 Green Inverted, Blend Mode Multiply.
Isolate Cyan
– Source 1 Blue, Source 2 Green, Blend Mode Multiply.
Isolate Magenta
– Source 1 Red, Source 2 Blue, Blend Mode Multiply.
Isolate Yellow
– Source 1 Red, Source 2 Green, Blend Mode Multiply.
Isolate adjacent colours Red+Yellow
– Source 1 Blue, Source 2 Red, Blend Mode Subtract.
Isolate adjacent colours Red+Magenta
– Source 1 Green, Source 2 Red, Blend Mode Subtract.
Isolate adjacent colours Green+Yellow
– Source 1 Blue, Source 2 Green, Blend Mode Subtract.
Isolate adjacent colours Green+Cyan
– Source 1 Red, Source 2 Green, Blend Mode Subtract.
Isolate adjacent colours Blue+Cyan
– Source 1 Red, Source 2 Blue, Blend Mode Subtract.
Isolate adjacent colours Blue+Magenta
– Source 1 Green, Source 2 Blue, Blend Mode Subtract.
There are also some check boxes found in the Layer Styles dialog in the Advanced Editing section that allow creative selective display of the colour channels for a layer.
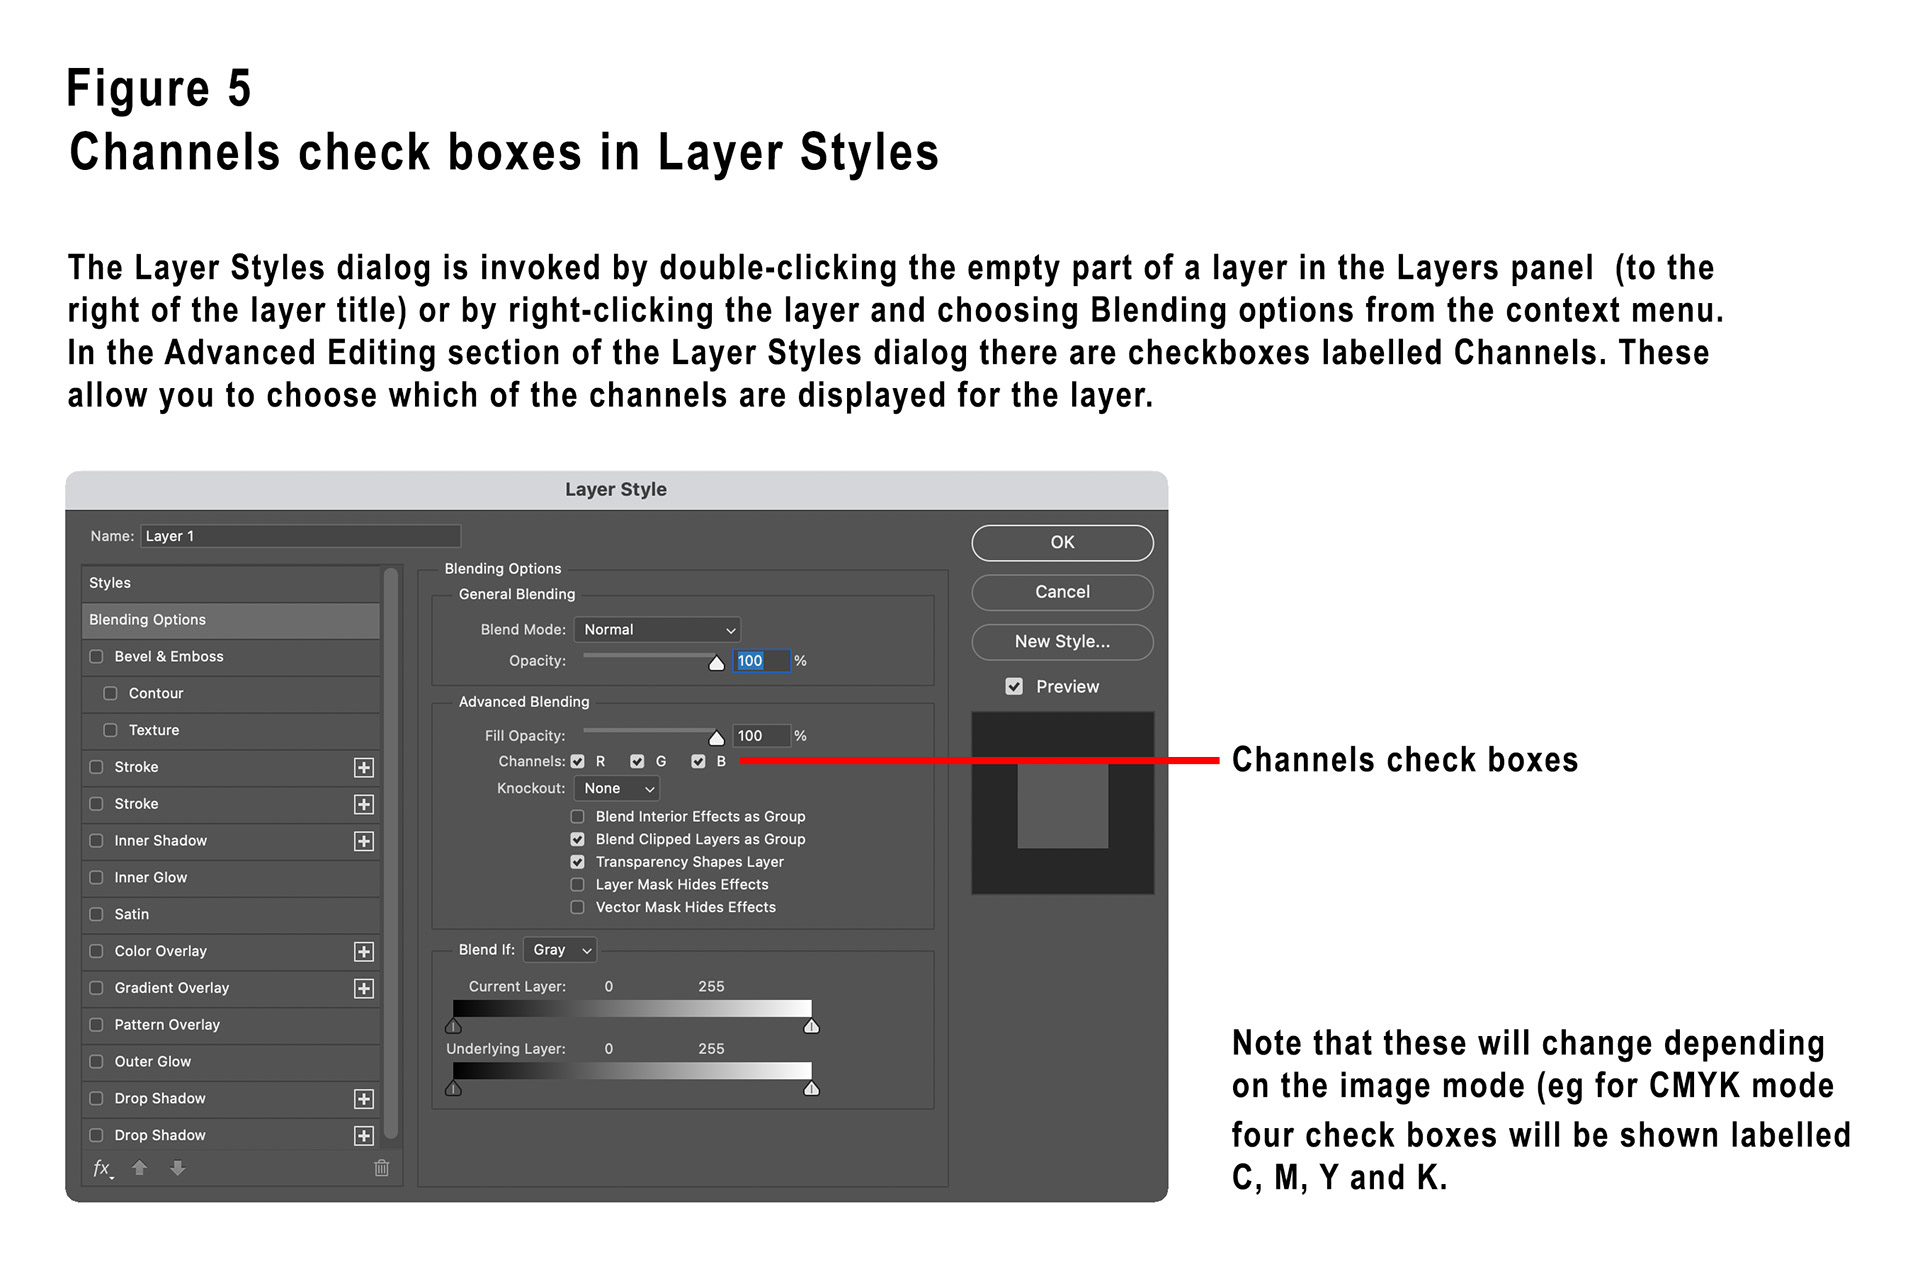
The check boxes for all colour channels are ticked by default, simply uncheck those you do not want to display for the active layer.
Note that these check boxes will change depending on the image mode (eg for CMYK image mode four boxes will be displayed labelled C, M, Y and K).
In part three we’ll conclude this series with a few practical examples.
This article is a companion to the article published in the April 2026 issue of Artists Down Under magazine.